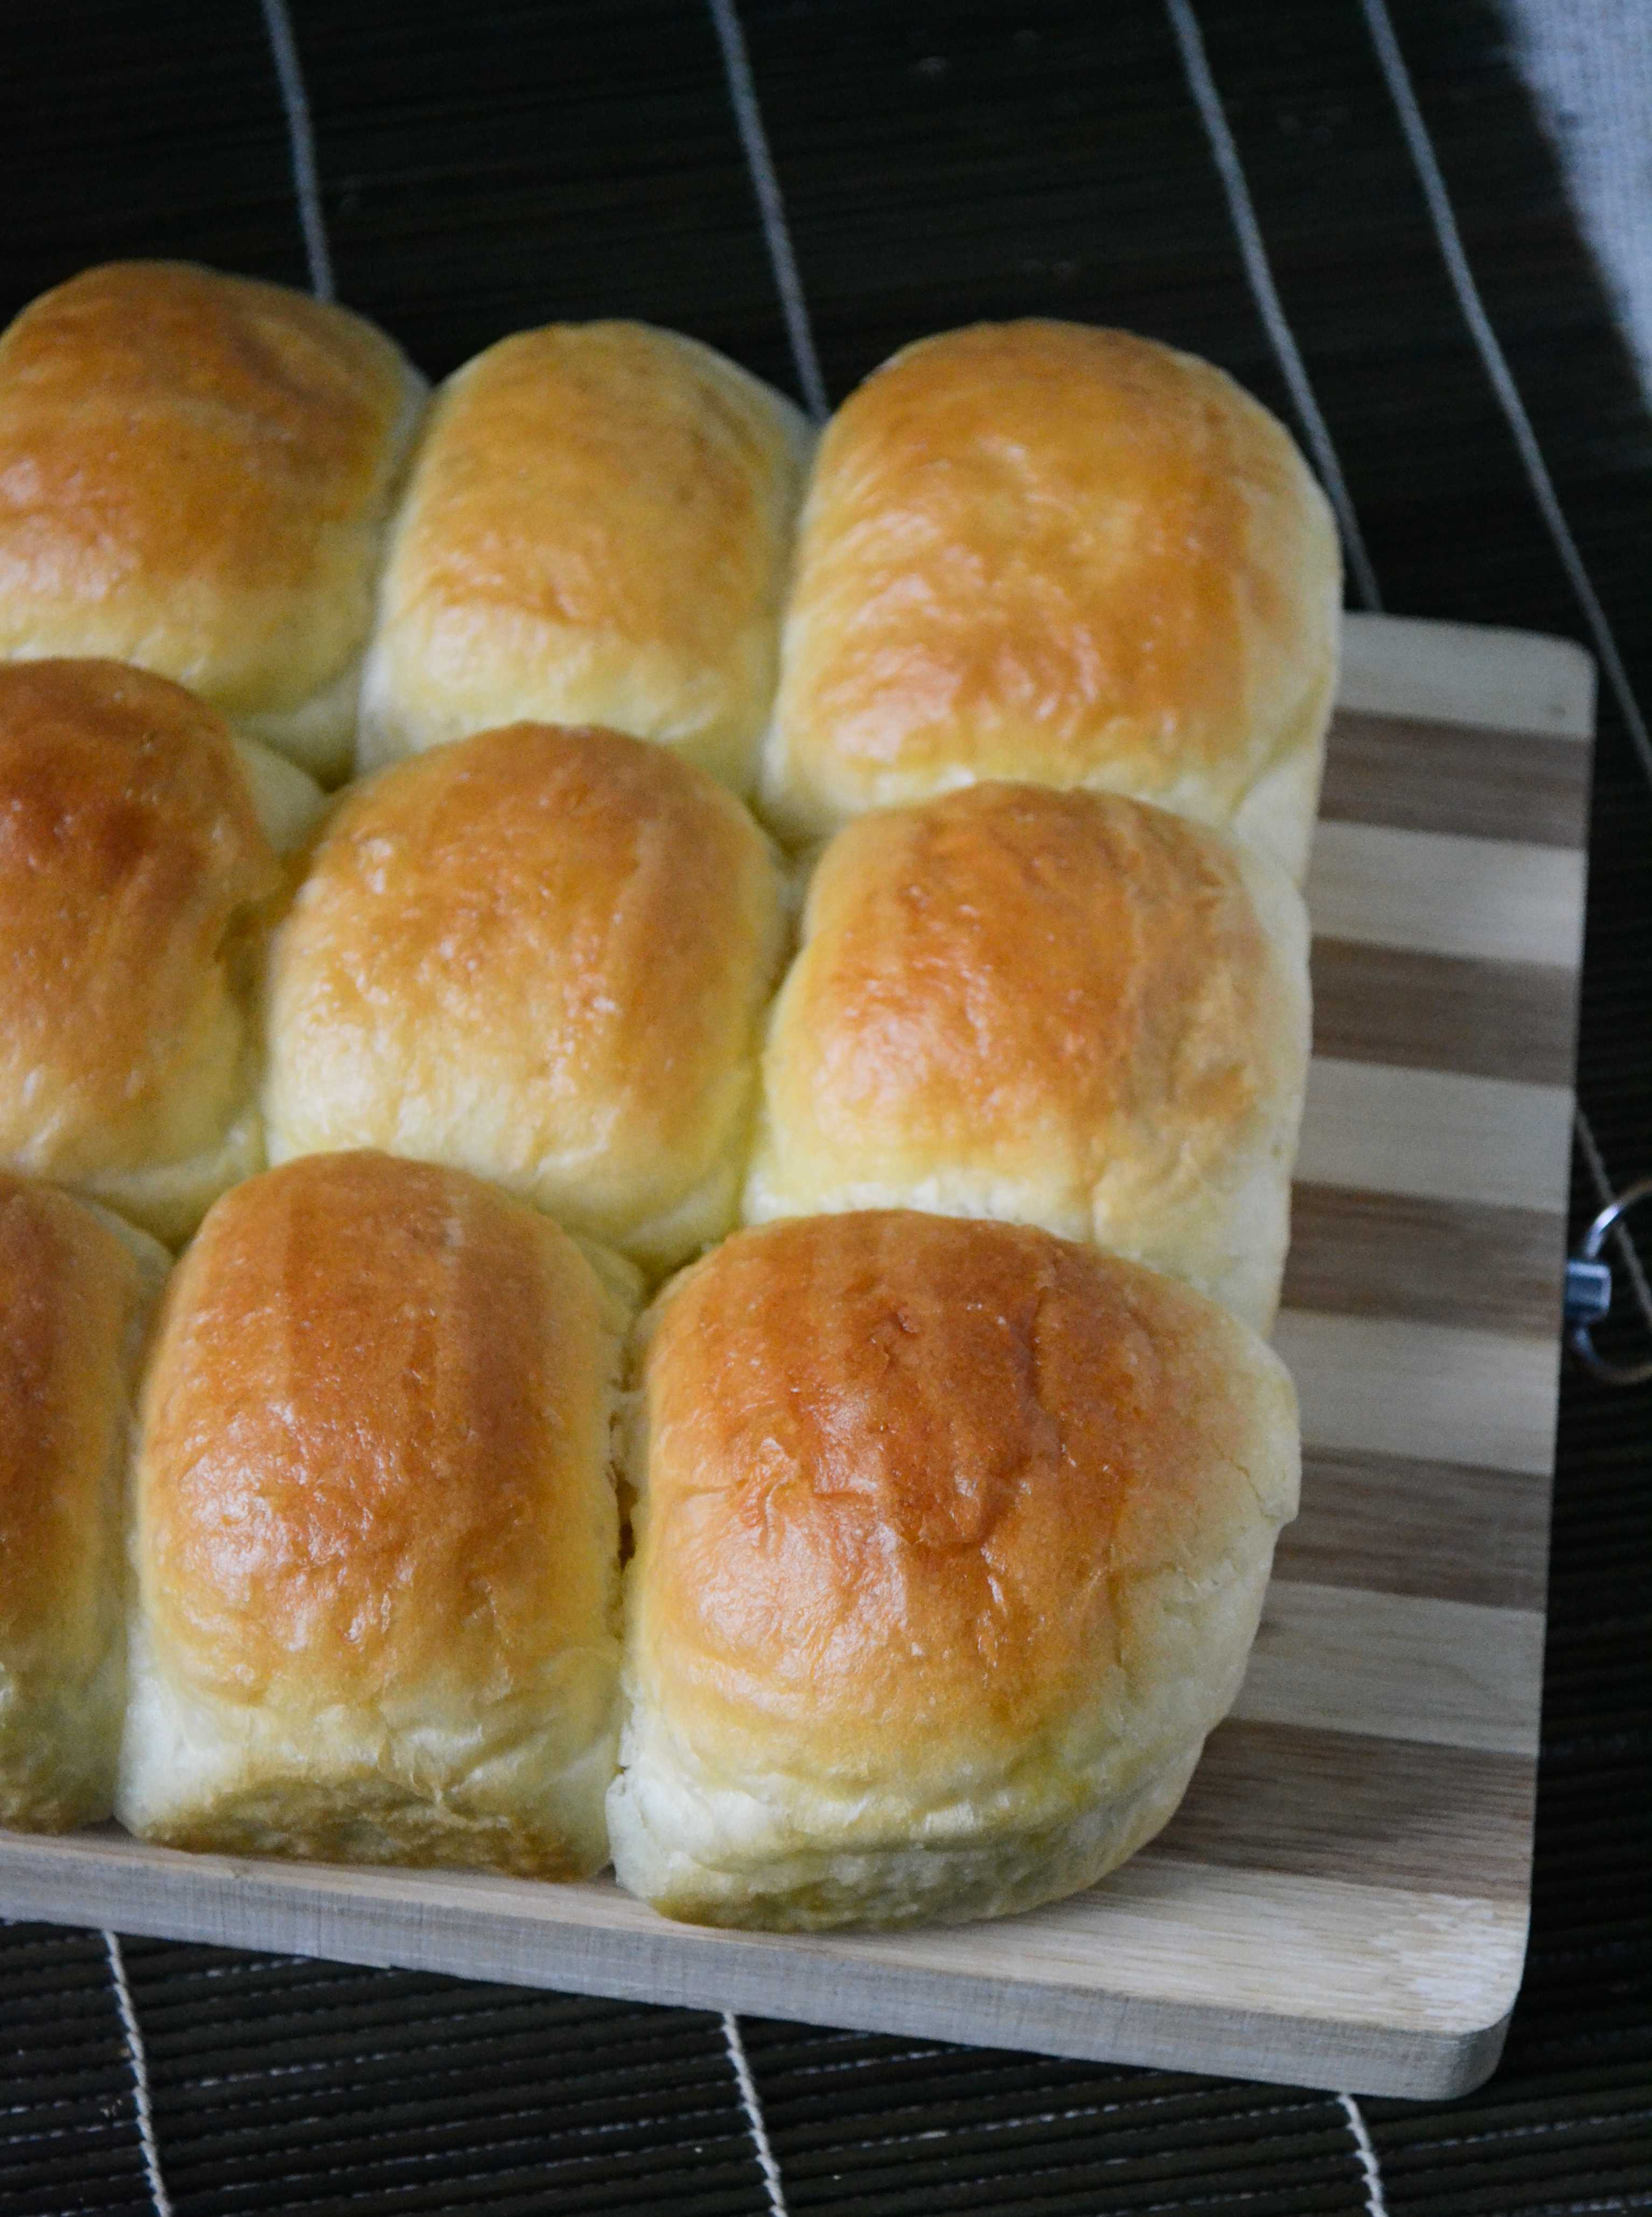
Last week I posted Pav Bhaji recipe, and promised to post the pav buns recipe soon. And here I come with the home made absolutely soft pav buns. These are perfect for the home made chaat recipes and are so much better than the store bought ones. Whenever I make bread at home, I am so much satisfied with the end result. And I have completely stopped buying bread from stores. If you have a little patience, then you will be surprised how good a home made bread can be.

I used the white bread recipe with tangzong method for these buns. The dough is slightly sticky to work with. Use a bench scraper and slightly dust the dough while kneading. Brush the rolls with milk just before placing it in oven and they turn out so beautiful. These buns can be used to make vada pav, pav bhaji and any other chat which needs pav buns. Aren’t they beautiful to look at??
Update: December 2015 : During February I went to Blogger’s Meet in Chennai and I got a great opportunity to make these buns for my most favourite bloggers on earth. ANd I was so happy when they all enjoyed it. This recipe has become a standard recipe for me and I haven’t tried to search for any more recipes for the buns. The tangzong method yields super soft buns and you will be hooked for ever. I made a video to demonstrate the preparation. Hope you enjoy it..
Makes 12 Buns
Ingredients:
For The Tangzhong:
All Purpose Flour-1/6 cup
Milk-1/2 cup
For The Dough:
All Purpose Flour-2 1/2 cups
Sugar-3 1/2 tbs
Salt-1 tsp
Curd/ Yogurt-1/4 cup
Milk Powder-1 1/2 tbs
Instant Yeast-2 tsp
Butter-3 tbs
Procedure:
For the Tangzhong:
1. Mix flour and milk.
2. Whisk until you get a lump free mixture.
3. Keep it on stove and keep on stirring until the mixture turns into a clumpy dough.
4. Remove from flame, pour the tangzhong into a bowl and cover with cling wrap.
5. The cling wrap should touch the surface of the tangzhong prepared.
6. Allow it to cool.
For The Bread:
1. Whisk curd and keep it aside.
2. In a bowl add flour, salt, sugar and yeast.
3. Make a well in the centre and add the prepared tangzhong and curd.
4. Add about 1/2 cup of water and make a soft sticky dough.
5. Add butter and knead until incorporated.
6. Take the dough to the counter and knead continuously for 10 minutes.
7. The dough should pass the window pane test.
8. Take a small piece of dough and stretch into a thin square. You should be able to stretch it with out breaking the dough. The dough should be thin enough to pass light through it. If the dough breaks then you need to knead it more. But if stretches without breaking, then you have done enough kneading.
9. Roll the dough into a ball.
10. Grease a bowl with oil, place the dough into it and slightly rotate to coat the dough with oil.
11. Cover with cling wrap and set it aside for 1 hour.
12. The dough should double in size.
13. Now poke a hole in the centre of the dough. If the hole stays as it is then you can proceed to the next step. If it bounces back then you need to proove it a little longer.
14. Punch down dough and roll it into a thin disc.
15. Cut it into 4 equal parts.
16. Slice each portion into 5 equal parts.
17. Roll each portion into a tight ball.
18. Place all the rolls in a 12″ * 9″ greased tray.
19. Cover with cling wrap and allow them to double in size.
20. Preheat oven to 175C.
21. Brush the top of bread with milk and bake it for 20-25 minutes.
22. Remove from oven and brush the buns with butter.
23. When you can handle it with hand, remove it from the tin and place on a wire rack and allow it to cool completely.
24. Prepare bhaji and serve it along.


I made Pav Bhaji. Click on the image for recipe..
Homemade Eggless Pav Buns Recipe
Ingredients
For The Tangzhong
- All Purpose Flour-1/6 cup
- Milk-1/2 cup
For The Dough
- All Purpose Flour-2 1/2 cups
- Sugar-1 tbs
- Salt-1 tsp
- Curd/ Yogurt-1/4 cup
- Milk Powder-1 1/2 tbs
- Instant Yeast-2 tsp
- Butter-3 tbs
Instructions
For the Tangzhong
- Mix flour and milk.
- Whisk until you get a lump free mixture.
- Keep it on stove and keep on stirring until the mixture turns into a clumpy dough.
- Remove from flame, pour the tangzhong into a bowl and cover with cling wrap.
- The cling wrap should touch the surface of the tangzhong prepared.
- Allow it to cool.
For The Bread
- Whisk curd and keep it aside.
- In a bowl add flour, salt, sugar and yeast.
- Make a well in the centre and add the prepared tangzhong and curd.
- Add about 1/2 cup of water and make a soft sticky dough.
- Add butter and knead until incorporated.
- Take the dough to the counter and knead continuously for 10 minutes.
- The dough should pass the window pane test.
- Take a small piece of dough and stretch into a thin square. You should be able to stretch it with out breaking the dough. The dough should be thin enough to pass light through it. If the dough breaks then you need to knead it more. But if stretches without breaking, then you have done enough kneading.
- Roll the dough into a ball.
- Grease a bowl with oil, place the dough into it and slightly rotate to coat the dough with oil.
- Cover with cling wrap and set it aside for 1 hour.
- The dough should double in size.
- Now poke a hole in the centre of the dough. If the hole stays as it is then you can proceed to the next step. If it bounces back then you need to proove it a little longer.
- Punch down dough and roll it into a thin disc.
- Cut it into 4 equal parts.
- Slice each portion into 3 equal parts.
- Roll each portion into a tight ball.
- Place all the rolls in a 12" * 9" greased tray.
- Cover with cling wrap and allow them to double in size.
- Preheat oven to 175C.
- Brush the top of bread with milk and bake it for 20-25 minutes.
- Remove from oven and brush the buns with butter.
- When you can handle it with hand, remove it from the tin and place on a wire rack and allow it to cool completely.
- Prepare bhaji and serve it along.


Wow!!! So soft and super looking buns..
wow, really soft buns, love to use it for vada pav too.
These pav buns are fluffy and perfect
Very soft buns….
Soft and delicious buns!
wow! nice soft buns..
Can’t wait to make these at my home too. They look so gorgeous.
Very soft buns. I tried this bun today, mine doesnt get color on the top, only the bottom get colored. I’m using Morphy Richard OTG oven and i used bake mode. Any suggestions why the top doesnt get colored?
Did you give milk wash. Milk wash gives wonderful colour on top..
What is the use\importance of making Tangzhong….???
Tangzong is a method which gives moisture to the finished bread and keep it fresh for long. There is a lot of difference between a tangzong dough and the usual dough..
I tried it today, the result was awesome…. Great recipe… Thank u so much 🙂
I tried it today, the result was awesome, super soft…. Great recipe… Thank u so much 🙂
Hi Gayathri,
I properly followed this recipe and the result is just awesome!!! 🙂 We really enjoyed it…
Does Instant yeast call for 10-15 minutes kneading??? Because many times I heard that you can proceed without kneading if you are using instant yeast….Is it true? Please reply because I m totally unknown about the fact.
Hi, you have to knead the dough. The only advantage of using instant yeast is that you can add it directly to the flour before adding the liquid. But from that point, you need to proceed as usual..
Hi,
I have active dry yeast..Can you please tell me how to use that in this recipe?
If using dry yeast, then please skip curd. Mix together 1/4 cup of warm water and 2 tsp of dry yeast and allow it to proof. After ten minutes, if it is bubbly, add it to the flour along with all the other ingredients.
Thanks Gayathri
Hi Gayathri, HAve tried this recipe twice and really loved the outcome. I guess with few more trials should nail. Thanks for sharing it. I have 2 queries
1) the day I bake the buns they taste awesome but 2nd day they don’t taste that fresh and soft unlike the store bought buns that stay soft for couple of days. Am I missing something or I am not kneading the dough that well?
2) When you let the dough rise for the first time , Is it ok if I shape the buns made out of the risen dough but instead of letting it double again I refrigerate this dough and bake it the next day when I actually planning to serve them. Would the buns still taste the same? If this works it makes life easier if prep is done a day in advance. Hope I was able to explain myself. Thanks
Hi Namrata, home made buns loose freshness soon. Keep them packed in cling wrap to preserve freshness. If just kept in a box they will dry as there is no preservative to keep it fresh. And you can refrigerate the shaped rolls in fridge. And bring it to room temp and let it rise before baking.
Thanks for such a quick response. Am assuming that I could follow this for all other bread recipes. Also does a refrigerated dough takes more time to rise the 2nd time. Thanks.
Yes Namrata, you can follow this for all bread recipes. And yes it takes longer for second rise as the dough needs to come back to room temperature..
The buns turned absolutely cottony soft and fluffy. Thank you so much for introducing to the roux method.My kids really liked it.And most important my husband who stays away from Pav bhaji asked me to make another batch for dinner.He liked it so much that he just went on praising the buns.
Would like to add that I kept another batch in the fridge after 1st rise at night.Took out of fridge next morning let it come to the room temperature and then shaped them and continued the process.They turned out super perfect as expected.
I tried ur recipe
Mine doesnot get colour on top
I gave milk and honey wash too
And it turned little hard due to overbaking inorder to get colour
I used LG convection .
How do I measure 1/6 cup flour?
It is half of 1/3 cup..
Please tell me if I can bake the pav buns at 180 degrees for 20 mins….as with earlier experience my Morphy Richard 28 series otg had burnt the breads I tried….or is their any other temperature which can be used….does my bread burn on bottom because it is a small otg and temperature used is high
Make sure both filaments are on. I think having only the bottom filament on can cause to burn the bottom of the breads.
Thanks for the quick response…..you are right….in my otg only bottom rod burns on bake mode and both rod burn on toast mode….should I use toast mode….right now I have kept your pav bun recipe for the 2 nd rise and I am still doubtful how to bake it
Use the toast mode. It will be fine..
Hi
I tried the receipe the texture of the bread was excellent only thing I found was that the pav had little yeast taste. I used the exact measurements provided on the website.
Gayathri is there anything where I went wrong also I used instant yeast PRIME brand which I had recently purchased.
Please help
I have seen some readers complaining about the yeast smell. I haven’t got any but those who are sensitive to yeast may find it odd. I don’t think the yeast was at fault, as the buns turned out softer. Next time, may be reduce the amount of yeast and try.
Sure Gayathri thanks for your response
May be instead of 2tsp of yeast I will try with 1tsp yeast and will surely let you the result as you are my cooking guru Gayathri
Will 1tsp be enough for 2 1/2 cups of flour just let me know please as am eager to try the receipe as many times till I get convinced .
Can we have one WhatsApp group Gayathri where we can find instant answer anytime when we are making the receipe
Please create one WhatsApp group
Reducing yeast will increase the proving time. It will take some more time to double but I think you may not get that yeast smell.
Very happy that I tied out….super soft buns..color on top was perfect.,I would like to know if I can use this recipe to mak chicken bread?
Thank you so much. Of course you can do this with any type of filling.
Tried the recipe and it came out absolutely amazing, super soft..thanks for sharing such a lovely recipe.
Hello Have tried making bread using this method. The instant yeast which is like granules in my case remained as granules and didnot mix into the dough at all. Can I activate the instant yeast with warm milk and then add to make the dough ?
In that case, prove the yeast first and then add it to the flour.
hi gayatri,
thank you for this recipe.
i have two questions.
what band of instant yeast do you recommend?
can this same recipe be used for burger buns.
thanking you
regards
iris
Yes, you can use the recipe..
Cam we use this for normal beads also the same fluffy it will turn out
Yes, you can use it to make loaf. It turns out beautiful..
Dear Gayathri, Thanks for such a recipe. I had tried some other recipes earlier, but yours is perfect. I made 4 batches of buns & 1 set pavs with this recipe today. And every time, it came out perfectly well. Only one thing – the 12 pavs were too small. You could make big pavs?
That is great Kavitha. Decrease the amount of pav buns. Instead of 12 make 8 or 6 to get larger ones
Hi gayathri would love to try this recipe but just wanted to know that can I try this with whole wheat or normal atta instead of maida
Yes you can. I myself have tried with whole wheat flour and the recipe is also in the blog..
Dear Gayathri,
I followed your pav bun recipe & it turned out wonderfully well.
You have an amazing website.
lakshmi
Hii gayathri.. Want to try this recepie but can u pls tell me that can I replace milk powder with milk and if yes then how much milk to be added.. ?? Thanks in advance
Skip the water used to knead the dough. Use 1/2 cup milk and skip adding the milk powder also.
Thanks for such a prompt response.. Will try and let u know about the outcome.
Thanks a lot for the prompt reply.. Will try and let u know about the outcome.
Hello Gayatri ji, I tried this recipe but pav becomes heavy and to some extent raw. I have industrial oven. I keep 175 – 200 c. Please explain how solve this issue. Thank you.
You are under baking the rolls. These are supposed to be so soft and fluffy. I think there is some problem with the temperature in the oven. Please check it.
Hi Gayatri,
Your blog is my gormet cook bible…I ‘m so fascinated by all the time and effort you put in. I now trust your recipes blindly and they turn out awesome. However, I tried this recipe twice over a couple of months. Both the times the first rise happened well and the second time when i left them to rise after making the balls, they didn’t and i got very small, dense pavs. I’ve followed the recipe to the T. The only concern I see is that the temperature is very high in the geography I live. What could be the reason. Please advise.
Thank you so much Vinitha. Comments like this inspire me to do more in the blog. As for the pav, I think you are over proving the dough the first time. Prove it until just double in volume. If the climate is hot, it tends to happen very soon. So don’t follow the time given in the recipe, but look out until the dough doubles in size. Then just move on to the shaping part.
Perfect recipe. Have tried it n result was soft n awesome pav.. thanks a lot mam
I like Pav Bhaji Recipe. Awesome cooking tips. thank you so much for sharing.
Can you please tell me how much is a cup here? 125 grams ir 250? I want to make them right now.
It is a 200 ml cup
Can you pls guide me out with the temperature, and both the rods should be on throughout the procedure… in convection mode
Both the filaments need to be on throughout baking, only then it would be uniformly baked. If you have a fan, switch it on too. It would spread the heat more evenly. Use the same temperature mentioned in the recipe for baking.
Dear Madam,
Please let me know if I need to skip yeast, can I do it. What I need to substitute with.
Varsha
The leavening in this recipe is yeast, so unfortunately you can’t skip it.
Hello,
Thanks for the wonderful recipe. I am very scared when it comes to proofing yeast and this recipe was just perfect. I followed the recipe to the T and the result was good. I have a query:
How do we know whether the bread/pav is completely cooked? Like when I tried.. I had set the timer according to the instructions, after that I baked for extra 6 mins… few pavs were slightly raw from beneath. Hod can I take care of that in the future.
Thanks
Thanks for trying Nuti. Every oven behaves differently. So we need to find out what timing works for the oven. Keep my recipe as a base and either increase or decrease the timing seeing how your oven works. It is a bit of trial and error. You will get it soon.
Can we use dry active yeast instead of instant yeast
Yes, you can use. But you need to prove it before adding to the flour mx. Take some liquid from the recipe itself for proving.
I have a doubt. In the video recipe sugar is 3 1/2tbs , whereas in the recipe card it says 1tbs. How much are we supposed to use ?
Also, I have a convection microwave, setting it in the lower rod with 180c for 20-25 mins should be fine ?
Am gonna try this Tomo. Curious.
I usually go for 3 1/2 tbs, but readers found that it was too sweet. That is why I reduced it while doing the video. You can use 1 tbs if you want mildly sweet or 3.5 tbs if you like sweeter buns.
Hello mam…can we double or triple the recipe?? If yes then amount of yeast plz
Yes you can definitely double or triple. If doubling, double the yeast. But if tripling, use only double the quantity.
Mam, please suggest substitute for yeast. What may I use if not comfortable with yeast?
If you want to avoid yeast, please try this. https://gayathriscookspot.com/2020/05/egg-free-pav-buns-without-yeast-video-recipe/
Thanks for a wonderful recipe mam ,,my buns came out brilliant in 1st attempt,,I always make chocolate cake too using your recipe .
Thank you so much for trying and sharing your results.
This is the best ever Pav I have baked. Super soft and super yummy. Just loved it
That is wonderful. Thank you so much for sharing!
Mam will you share recipe in grams…I became great fan of your bread recipe.. waiting for your reply
Thanks in advance
My one cup equals 130 gm maida, 200 gm butter, 200 ml of any liquid and 200 gm sugar. Hope this helps in the conversion,