Since the day I saw rose cakes in blogs, I wanted to make it. At first I was planning to do it for Valentine’s day but Sruti wanted it for her birthday. So to make daughter’s wish come true I made it for her birthday. The cake was decided long before. She wanted a checker board cake so that she can get both the flavours she likes in the same cake. After going through many tutorials on the web, I was confident that i could make it for my daughter. I made the cakes the previous night and the assembling and icing part were done on the day.

After completing the decoration I shared it on FB and I got so many positive comments. Still I was not sure about how the cake will look once sliced. So keeping fingers crossed I waited for the moment. My daughter was so happy to see the finished cake and she showered me with so many kisses that I was on cloud nine. When we sliced the cake, she was literally jumping with joy. I didn’t expect such a nice finish inside. I used condensed milk cake for both vanilla and chocolate flavours.
 This is an update. Some of the readers who tried to make this cake gave me feed back that the squares were falling apart once sliced. The adhering of the squares depends on the amount of butter cream you use in between circles and layers. And the precision of squares also depends upon the perfect calculation. The height of every layer must be equal to the width of every concentric circle to get a perfect square. So measure your pans, measure the height of the cakes and then plan accordingly. This post is just to explain you the basic technique involved in making a checker board cake without special pans.
Ingredients:
For The Vanilla Sponge:
Butter-100 gm
Flour-250 gm
Condensed Milk-1 tin/ 400 gm
Baking Powder-2 tsp
Baking Soda-1 tsp
Curd-1/2 cup
Milk-1/2 cup
Vanilla Essence-1 tsp
For The Chocolate Cake:
Butter-100 gm
Flour-200 gm
Dark Cocoa Powder-50 gm
Instant Coffee Powder-1 tsp
Condensed Milk-1 tin/ 400 gm
Baking Powder-2 tsp
Baking Soda-1 tsp
Curd-1/2 cup
Milk-1/2 cup
Vanilla Essence-1 tsp
For The Butter Cream:
Butter-1 1/2 cups
Icing Sugar/ Confectioner’s Sugar- 6 cups
Vanilla Essence-3 tsp
Food Colour- a few drops
Milk-3-4 tbs
Procedure:
For The Vanilla Sponge:
1. Cream together butter and condensed milk.
2. Preheat oven to 180C.
3. Mix flour, baking powder and baking soda.
4. Add vanilla essence to butter.
5. Beat in curd and milk.
6. Fold in the flour mixture.
7. Pour into grease and dusted 8″ round pan.
8. Bake for 35-45 minutes.
9. Remove from oven when a tooth pick inserted comes out clean.
10. Invert the cake on a wire rack and allow it to cool completely.
For The Chocolate Sponge:
1. Cream together butter and condensed milk.
2. Preheat oven to 180C.
3. Mix flour, cocoa powder, instant coffee powder, baking powder and baking soda.
4. Add vanilla essence to butter.
5. Beat in curd and milk.
6. Fold in the flour mixture.
7. Pour into grease and dusted 8″ round pan.
8. Bake for 35-45 minutes.
9. Remove from oven when a tooth pick inserted comes out clean.
10. Invert the cake on a wire rack and allow it to cool completely.
For The Butter Cream:
1. Cream butter until light.
2. Sift the icing sugar to get rid of any lumps.
3. Using an electric beater, beat butter along with sugar and essence.
4. Add sugar one cup at a time.
5. After adding all the sugar, keep on beating for 2 minutes. The more you beat, the softer and smoother the cream will be.
6. Add tablespoons of milk and beat until the butter cream comes to the required consistency.
7. Add food colour and beat until the colour is mixed uniformly.
8. Keep the bowl covered until further use.
Assembling the cake and frosting the cake:

The chocolate cake.

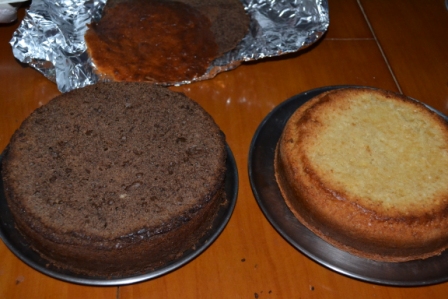 Trim the crusts with a serrated knife.
 Cut the cake exactly in the middle. I planned on making 2.5 cm squares. So as the cake was 5 cm high, I sliced it exactly into half and ended up with 2 2.5 cm high sheet cakes. Place a thread in the middle of the cake and bring the ends together.
Pull away the ends in opposite direction so that the thread slices the cake.

You will end up with two sheet cakes.
 Divide the vanilla sponge also like this.
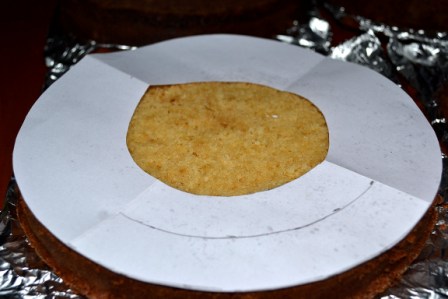
 Fold a paper into 4 and draw circles measuring 2.5 cm, 5 cm, 7.5 cm and 10 cm radius with the same centre point. Cut off the 2.5 cm circle. Cut the outer circumference also.
 Place the circle on the cake alligning both the outer circumferences.
 Slice the inner circle.
Now cut off the next circle in the paper.
 Place it on the cake and slice.
 Now cut off the next circle, place on cake and slice.
 You will get 4 circular cakes like this.
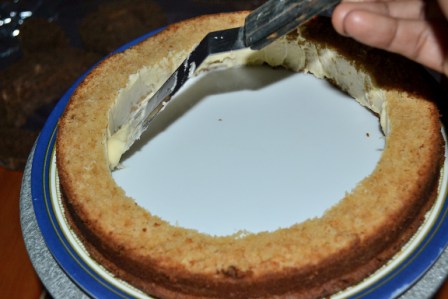 Apply butter cream on the inner sides. If the butter cream is not sufficient, then the pieces will fall apart once sliced.
 Place alternate flavoured rings and arrange as shown.
 Apply a coat of butter cream on top.
 Once the base layer is done, apply a layer of butter cream on top and make the second layer on it. Likewise finish all the four layers.
 Mix the butter cream a little thin adding some milk. This is used for crumb coating the cake.
 Apply a generous amount of butter cream on top and smooth it with a spatula.
 Apply butter cream on the sides and use a spatula to fill in all the gaps and smooth the butter cream.
 Once smooth the cake is ready to pipe rosettes

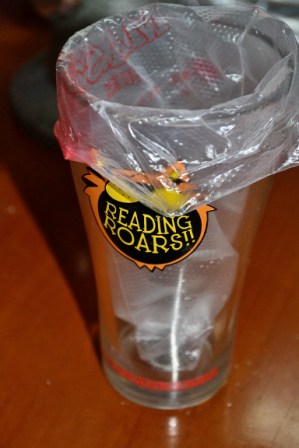 Place the piping bag with the tip inside a long glass.
 Add coloured butter cream.
 Cover the opening by twisting it tightly.
 Pipe rounds on the crumb coated cake. A rose is got by piping out 2-3 swirls starting from the centre point.
 Finish piping on all the sides of the cake.
 Arrange it for the birth day and wait for the birth day girl to arrive from school.
 Slice it up. See the perfect squares inside. You need to do some maths before you start layering the cakes. Every thing depends on the size of the pan and the size of the square you want.
 Serve and enjoy…

Eggless Checkerboard Rose Cake
Ingredients
For The Vanilla Sponge
- Butter-100 gm
- Flour-250 gm
- Condensed Milk-1 tin/ 400 gm
- Baking Powder-2 tsp
- Baking Soda-1 tsp
- Curd-1/2 cup
- Milk-1/2 cup
- Vanilla Essence-1 tsp
For The Chocolate Cake
- Butter-100 gm
- Flour-200 gm
- Dark Cocoa Powder-50 gm
- Instant Coffee Powder-1 tsp
- Condensed Milk-1 tin/ 400 gm
- Baking Powder-2 tsp
- Baking Soda-1 tsp
- Curd-1/2 cup
- Milk-1/2 cup
- Vanilla Essence-1 tsp
For The Butter Cream
- Butter-1 1/2 cups
- Icing Sugar/ Confectioner's Sugar- 6 cups
- Vanilla Essence-3 tsp
- Food Colour- a few drops
- Milk-3-4 tbs
Instructions
For The Vanilla Sponge
- 1. Cream together butter and condensed milk.
- 2. Preheat oven to 180C.
- 3. Mix flour, baking powder and baking soda.
- 4. Add vanilla essence to butter.
- 5. Beat in curd and milk.
- 6. Fold in the flour mixture.
- 7. Pour into grease and dusted 8" round pan.
- 8. Bake for 35-45 minutes.
- 9. Remove from oven when a tooth pick inserted comes out clean.
- 10. Invert the cake on a wire rack and allow it to cool completely.
For The Chocolate Sponge
- 1. Cream together butter and condensed milk.
- 2. Preheat oven to 180C.
- 3. Mix flour, cocoa powder, instant coffee powder, baking powder and baking soda.
- 4. Add vanilla essence to butter.
- 5. Beat in curd and milk.
- 6. Fold in the flour mixture.
- 7. Pour into grease and dusted 8" round pan.
- 8. Bake for 35-45 minutes.
- 9. Remove from oven when a tooth pick inserted comes out clean.
- 10. Invert the cake on a wire rack and allow it to cool completely.
For The Butter Cream
- 1. Cream butter until light.
- 2. Sift the icing sugar to get rid of any lumps.
- 3. Using an electric beater, beat butter along with sugar and essence.
- 4. Add sugar one cup at a time.
- 5. After adding all the sugar, keep on beating for 2 minutes. The more you beat, the softer and smoother the cream will be.
- 6. Add tablespoons of milk and beat until the butter cream comes to the required consistency.
- 7. Add food colour and beat until the colour is mixed uniformly.
- 8. Keep the bowl covered until further use.
Notes
P.S :
Please take a look at the blog post for the technique involved in making the pattern and covering the cake with rosettes.
Please take a look at the blog post for the technique involved in making the pattern and covering the cake with rosettes.


Gorgeous cake, love the rose frosting much…
hats off to u..very well done. great work..i know how diff it is to make this good. nicely and perfectly done. keep rocking.
Perfect dear 🙂
Wonderful cake and nice tutorial Gayathri! Happy B’day to Sruthi! Hope you guys had a nice party! 🙂
omg seriously… u made your daughter s day and i am floored! Gayatri you should open a bakery yourself.. u would be in high demand.. is one of the most beautiful cakes i have laid my eyes on
wow..beautiful Gayathri..awesome presentation
As i told earlier, a super stunning,gorgeous rose cake..You have loads of patience Gayathri,incredible work dear;
beautifully decorated cake looks fabulous
Wow great. Lot of work. Looks perfect flowers. How long it took to finish this?
Wow beautiful cake.
Gorgeous cake akka and I have never seen such detailed explanation and your checker effect looks so so perfect, can’t take my eyes of it. I think you would spent more time writing this post than doing the cake. I am sure your little princess was so happy. She is blessed to have a wonderful amma like you.
Love
Priya
Extremely Hard working . Then the neat result Dear. Just Awesome. Lovely. Hats of to you.
Lovely treat to eyes.Thanks for sharing the step by step pics , awesome work , inspires anyone to do it.
Beautiful decorations… Well explained with step by step pictures..
Awesome Job!! I have done the exact same combination once…checkerboard cake with rose pattern…its simply pretty na, both on the outside and the inside!!
Regards,
Manju
http://manjuseatingdelights.blogspot.com/
Perfecr checker board cake….love the rose
awesome effort 🙂 this shows your passionate towards cooking 🙂 seriously 🙂 i i loved each and every bit !
hello gayathri, this cake is just too adorable and thanks a lot for the perfect step by step pictures. You’ve done a really incredible job and i visit your website almost everyday and I really admire the effort that you seem to put into the various cuisines that you attempt, especially the eggless baking!! Keep up the spirits!!And wishing you a daughter a very happy and joy filled b’day
Regards,
Madhu
LOVELY CAKE,well explained,wishes to ur daughter
oh my.. tats really an amazing piece of work.. gr8 job!!
Unbelievable. In spite of the many steps involved, the end result looks so perfect!
Gayathri – u r an innovation queen!!!! I have seen people struggling with checkerboard cakes even after having a checkerboard pan and you have done it AWESOME!!! No words to describe!!!! simply amazed!!!
Sowmya
Ongoing Event – Tried and Tasted – Raks Kitchen
Ongoing Event – Dish it out – Lentils & Garlic
Ongoing Event – Know Your Dairy – Cheese
Ongoing Event – What is with my Cuppa?
Gorgeous cake Gayathri. Perfectly done…
awesome!
OMG gayathri.. u did so much and ur result is just amazing ..god I wonder if i can ever bake a cake to perfection like this for life time.. good job..
Hats off to you, Gayathri! I was almost shocked to see the checkers at first and wondered how you got them. 🙂
I’m not active on blogging these days but loved watching your post via FB and happy I found it. 🙂
Gayatri, you are sucha patient and meticulous person. Your family is indeed very lucky to be around you as an inspiration.
The ttention to detail, the very precise step wise instructions, the love for your daughter – all shine through here…
Hats off to you!
I am also feeling encouraged to try out htis checkered cake after seeing this post…God Bless you, thanks very much for sharing.
Awesome cake . good job
This looks out of the world gayathri.. and beautifully explained
Beautiful! Love the pics with all the steps.. Hats off to you for this perfect cake!
Lovely cake and very nice tutorial, happy birthday to Shruthi.
Wow….wonderful cake for a wonderful daughter….u r rocking….
Gorgeous looking cake, loved the pink rose frosting, u have done a wonderful job Gayathri…thanks for the detailed recipe with pictorials!
superb. Whenever I saw these cakes, always have wondered how did they get this pattern. Now I get it. Thanks.
really superb… the cake looks really gorgeous, can understand y ur daughter loved it!!! thanks for the step by step pics… very helpful!
http://sweettoothraf.blogspot.com
excellent work..awesome finishing…on the whole wonderful job…Keep rocking..
Belated birthday wishes to your daughter.Beautiful birthday gift…A very professional cake and amazing patience!Do you take classes?You have real talent..
this is so beautiful….may i ask which nozzle u used to make the roses..
Hello,
We showcase World’s Best Recipes to our readers daily and currently looking to help food bloggers gain more exposure.
We would like to invite you to join our community of food blogger and want to feature some of your best recipes on our website.
Our Members content is displayed on http://www.worldsrecipeshub.com in this format:
And Your Recipes Gallery will be displayed like this : Cooking With Siri
As you can see we link the full recipe back to your site.
Register your blog here http://www.worldsrecipeshub.com
Warm Regards
Belated Birthday wishes to your daughter… she already has the best gift in the world in a mother like u 🙂
Awesome cake… too good 🙂
Please help , what is curd?
Hi, it is yogurt…
It was awesome yaar. Really can’t take my eyes from the Cake.Good job.Happy to follow your blog.
Hi gayathri! Amazingly creative n delicious looking cake:)
In cake & icing, the butter u used is regular amul salted butter or white unsalted butter bought from dairy store?
Hi Nisha, I use unsalted cooking butter from Nilgiris. Not the white butter from dairy…
Hi Gayatri! my cousin and I just tried making this amazing looking cake for our Grandmoms birthday, but im sorry to say the cake did not taste good at all. It was not sweet, crumbled and did not taste like cake at all. Is there anything missing from the recipe?
Sorry to hear about it Vaishnavi. I have been using this recipe for the past five years. And yes it is not overly sweet. I keep it that way so that the icing together with the cake will not make it extremely sweet. I think you either overbaked the cake or used too much flour so that it crumbled. Usually this is the firmest cake perfect for carving. Even a small difference in the quantity of any ingredient may change the texture of the cake.
Hi,
Would it be possible to replace the condensed milk and curd in the cake recipes as I’m not able to find them?
Then you need to look for some other recipe because if you try to omit condensed milk and curd, then the whole recipe changes. I have used this because, this cake is firm enough for all the cutting and it doesn’t crumble.
simply superb…. both the cake and the tutorial ….
Luking very nice. I ll try. I wanted to know what nozzle u ve used. No. Of d nozzle please an d where can we get this nozzle.
It is a large star nozzle. I bought it in Chennai and it doesn’t have a number.
Wow!! This is beautiful and really so well explained!! I don’t think I could ever find the courage to try something like it!! Really lovely cake…
Can this cake be refrigerated
You can refrigerate it, but the cake needs to be at room temp while serving.
I came to this page while googling for aquafaba. I can’t help complimenting you, the rose frosting looks too good. You are really talented.
Hi Gayatri, I have been through some of your bakes and noticed that you use a 200ml cup for a lot of recipes. Have you used a 200ml cup for this recipe as well and do you use a 200ml cup for all your recipes?
Yeah, I use the same cup for all my recipes.
Hi Gayatri. So I made this cake for a birthday and it was a huge hit. The whole society was amazed on seeing the inside of the cake. I followed the recipe exactly though I did not make roses for frosting the cake and chose a petal design. My husband still wonders how I made the checkerboard. Thanks a ton for the recipe.
Hello Mam,
Thanks for the wonderful recipes!
Can we try the same cake with your oil based eggless vanilla and chocolate cake recipe
TIA
Hi Binada, you can use oil based cake for this.