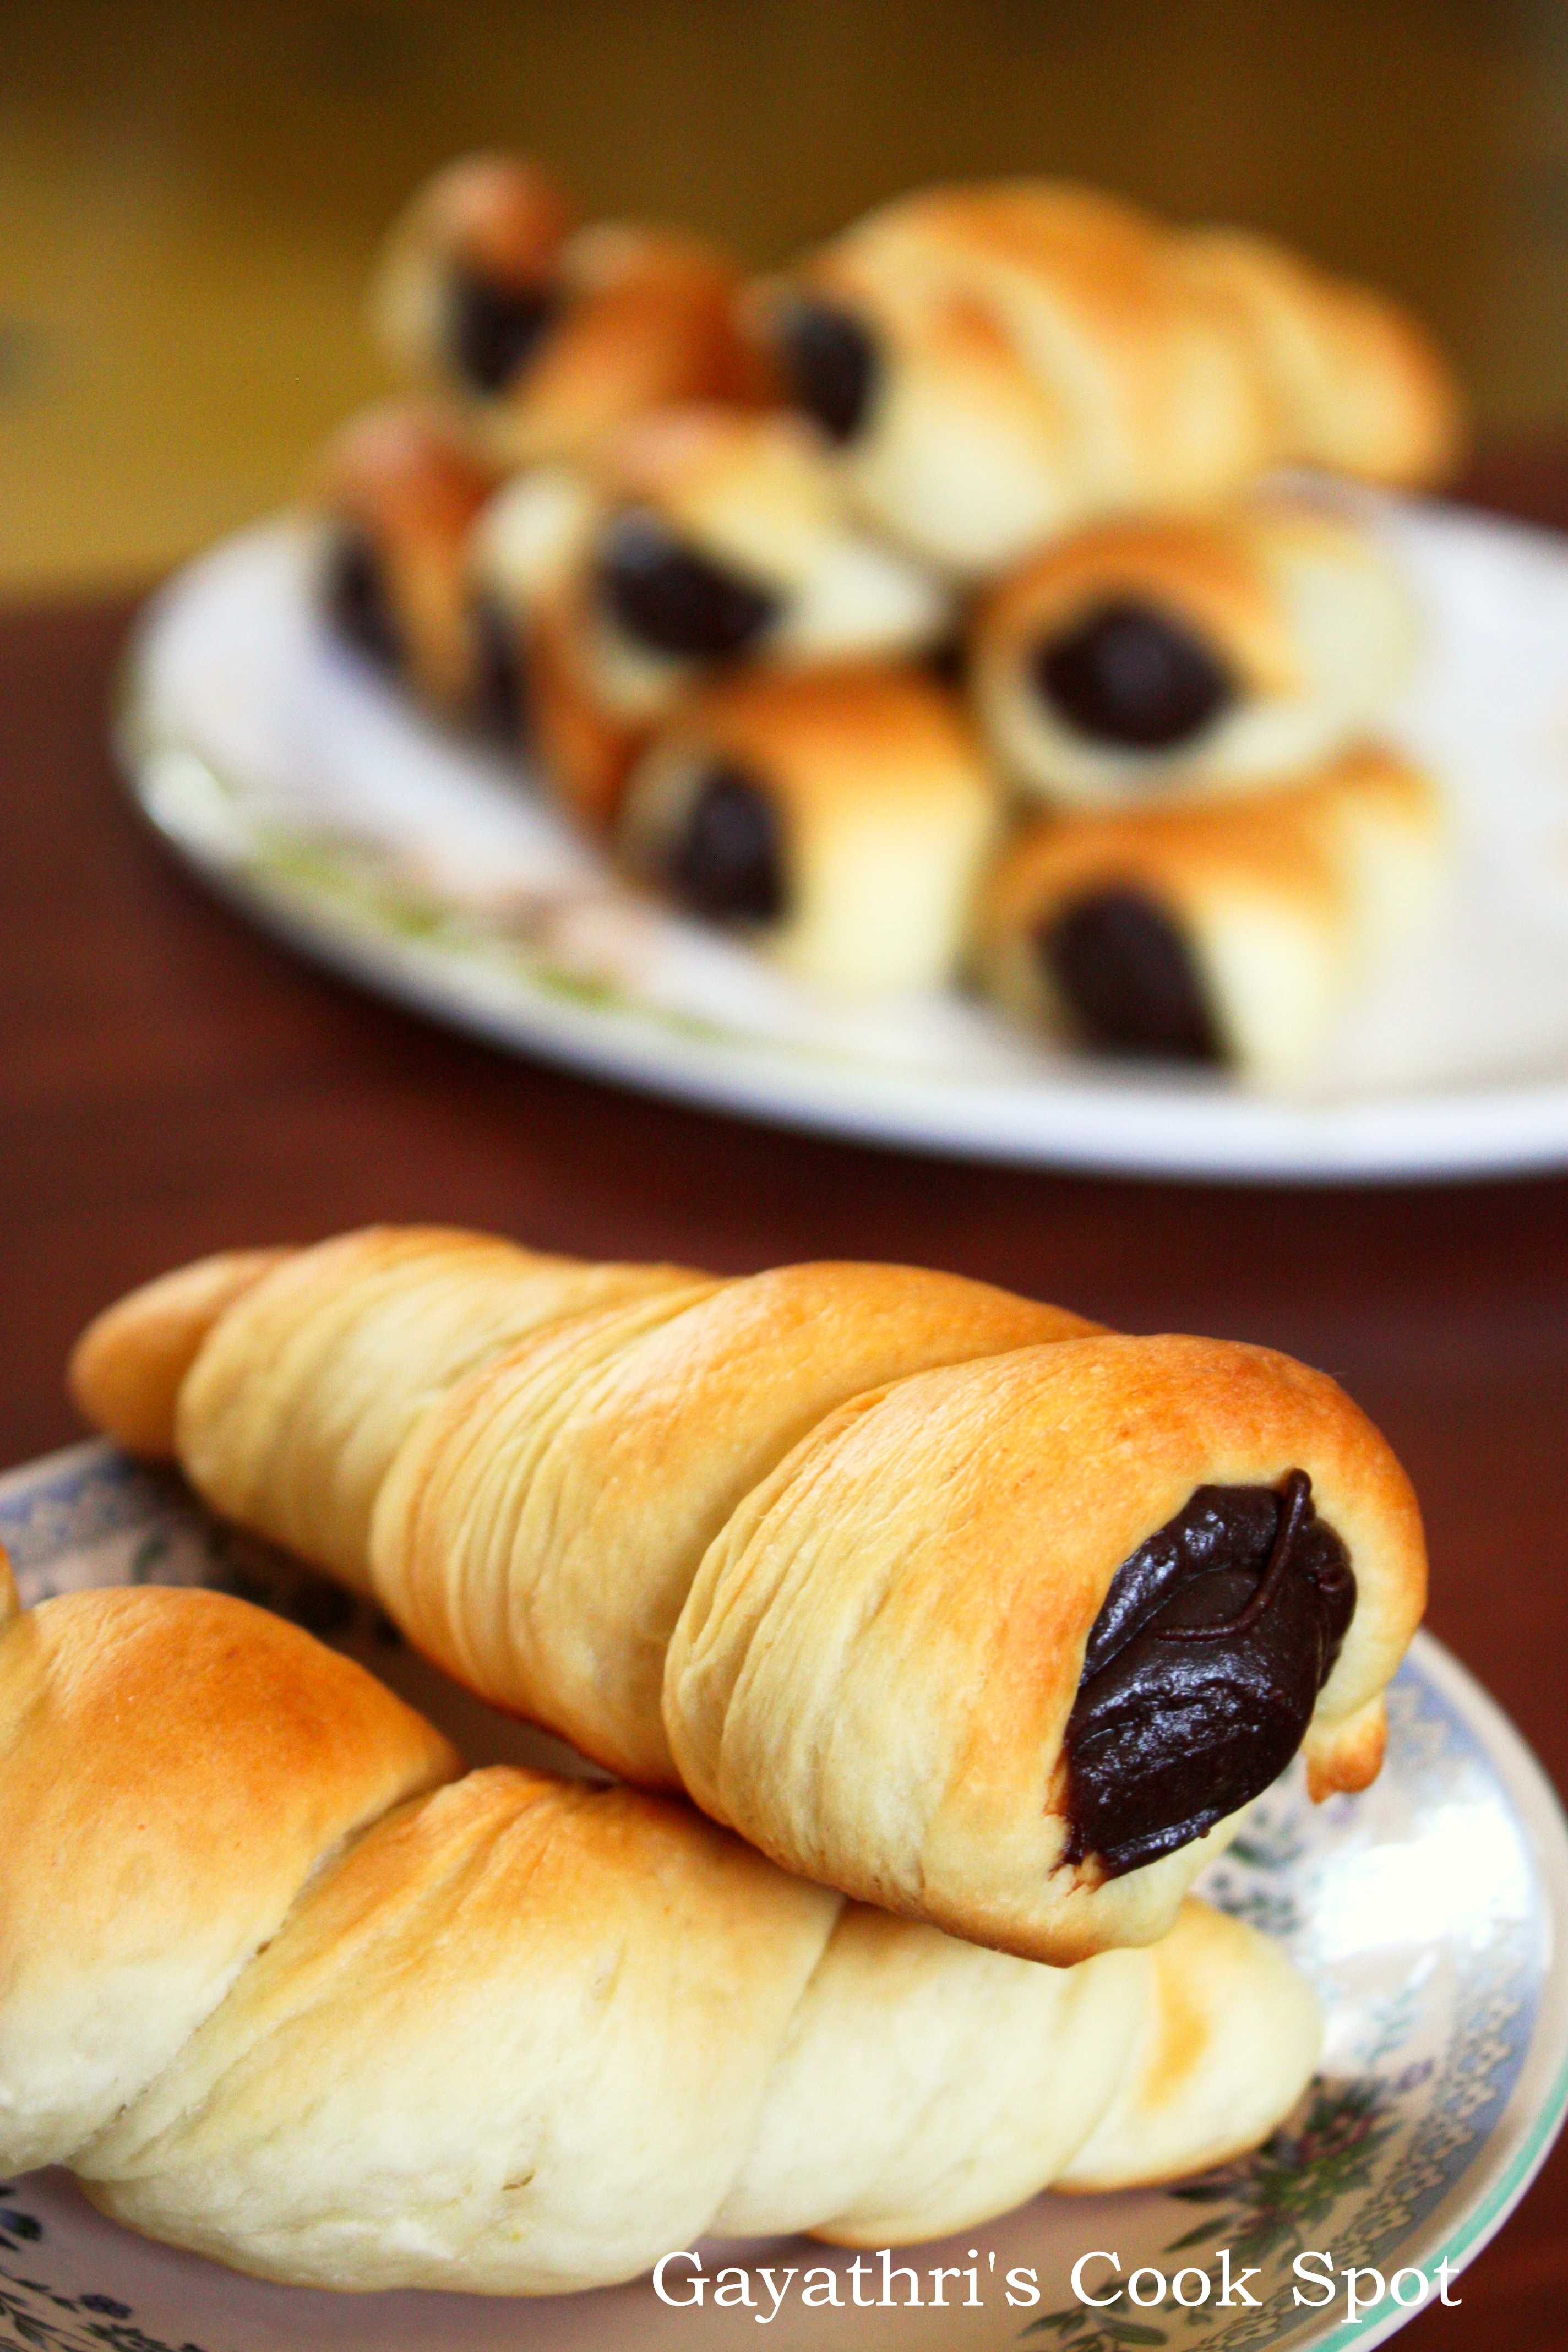
For this month’s Baking Eggless Group challenge I chose Chocolate Cornets recipe from an youtube video. This consists of a bread cone with chocolate custard filling. Both recipes contained eggs and the group tried baking it eggless. I will be posting a round up of the members recipes on April 3rd. I prepared 12 cornets. Every one liked it. My nieces along with my daughter enjoyed it very much. As I didn’t have cornet moulds, I prepared them with chart paper and foil. They came out very nice, but I am very sorry for not including the step wise pictures. I will give you the link for the video which teaches the technique.
Recipe Adapted From Cooking With Dog
Ingredients:
Makes 12 Cornets:
For The Dough:
Flour-300gm
Sugar-2tbs
Salt-1tsp
Instant Yeast-2tsp
Warm Milk-140ml
Baking Powder-1/2tsp
Buttermilk-4tbs
Butter-30gm
For The Chocolate Custard:
Milk-300ml
Sugar-4tbs
Vanilla Custard Powder-3tbs
Cocoa Powder-1 1/2tbs
Flour-1 1/2tbs
Butter-30gm
Bitter Sweet Chocolate-70gm
Vanilla Essence-1tsp
For The Cornet Moulds:
Chart Paper measuring 12.5cm*12.5cm -12nos
Foil measuring 15cm*15cm-12nos
Stapler
Procedure:
For The Bread Cone:
1. In a bowl, mix flour, sugar, instant yeast, salt, and baking powder.
2. Add buttermilk and milk and prepare a soft dough.
3. Knead the dough for 5minutes and then flatten the dough on the counter.
4. Place the butter in the middle and cover it up with the dough.
5. Now it will become real messy.
6. Knead the dough for another 5-7minutes until the butter is incorporated and the dough becomes super soft and elastic.
7. Place the dough in an greased bowl and cover with a towel.
8. Allow it to rise it for 1 hour.
9. Deflate dough and divide it into 12 equal parts.
10. Roll each ball into a roll and keep it covered on the counter for 5minutes.
11. Grease the cornet moulds.
12. Flatter each roll into a flat circle.
13. Roll it into a rope and pinch the edge. Now roll it into a 1 1/2′ long rope which is thin at edges and thicker in the middle.
14. Start from the bottom of the mould. Wind the rope from bottom to top and then pinch the end.
15. Place the prepared cornets on a greased tray and allow it to rise for 15-20minutess.
16. Apply a milk wash.
17. Preheat oven to 180C and bake the cornets until the top is golden.
18. Place the cornets on wire rack and allow them to cool.
19. Gently remove the mould from the cornet and store cornets in an airtight box until further use.
For The Chocolate Custard:
1. Mix milk along with custard powder, flour, sugar, cocoa powder and vanilla essence.
2. Strain it through a strainer to get rid of any lumps.
3. Heat it and stir it continuously until the mixture becomes thick.
4. Add butter and remove from flame.
5. Mix until the butter is incorporated.
6. Add grated chocolate and mix until the custard is smooth.
7. Transfer the custard to a bowl and cover it with a cling wrap. The cling wrap must touch the custard. This is to avoid the formation of skin on the custard.
8. Refrigerate until cool.
Assembling the Chocolate Cornets:
1. Take the custard in a piping bag or plastic bag.
2. Make a small hole at the tip.
3. Place the bag inside the cornet and squeeze the bag to fill the cornet with the custard.
4. Repeat for the other cornets.
5. Serve and enjoy.
Egg Substitutes I used For This Recipe:
For the bread dough I substituted the egg with butter milk and baking powder.
For the custard, I added custard powder instead of eggs.
Both worked out very well.

Eggless Chocolate Cornets
Ingredients
For The Dough
- Flour-300gm
- Sugar-2tbs
- Salt-1tsp
- Instant Yeast-2tsp
- Warm Milk-140ml
- Baking Powder-1/2tsp
- Buttermilk-4tbs
- Butter-30gm
For The Chocolate Custard
- Milk-300ml
- Sugar-4tbs
- Vanilla Custard Powder-3tbs
- Cocoa Powder-1 1/2tbs
- Flour-1 1/2tbs
- Butter-30gm
- Bitter Sweet Chocolate-70gm
- Vanilla Essence-1tsp
For The Cornet Moulds
- Chart Paper measuring 12.5cm*12.5cm -12nos
- Foil measuring 15cm*15cm-12nos
- Stapler
Instructions
For The Bread Cone
- In a bowl, mix flour, sugar, instant yeast, salt, and baking powder.
- Add buttermilk and milk and prepare a soft dough.
- Knead the dough for 5minutes and then flatten the dough on the counter.
- Place the butter in the middle and cover it up with the dough.
- Now it will become real messy.
- Knead the dough for another 5-7minutes until the butter is incorporated and the dough becomes super soft and elastic.
- Place the dough in an greased bowl and cover with a towel.
- Allow it to rise it for 1 hour.
- Deflate dough and divide it into 12 equal parts.
- Roll each ball into a roll and keep it covered on the counter for 5minutes.
- Grease the cornet moulds.
- Flatter each roll into a flat circle.
- Roll it into a rope and pinch the edge. Now roll it into a 1 1/2' long rope which is thin at edges and thicker in the middle.
- Start from the bottom of the mould. Wind the rope from bottom to top and then pinch the end.
- Place the prepared cornets on a greased tray and allow it to rise for 15-20minutess.
- Apply a milk wash.
- Preheat oven to 180C and bake the cornets until the top is golden.
- Place the cornets on wire rack and allow them to cool.
- Gently remove the mould from the cornet and store cornets in an airtight box until further use.
For The Chocolate Custard
- Mix milk along with custard powder, flour, sugar, cocoa powder and vanilla essence.
- Strain it through a strainer to get rid of any lumps.
- Heat it and stir it continuously until the mixture becomes thick.
- Add butter and remove from flame.
- Mix until the butter is incorporated.
- Add grated chocolate and mix until the custard is smooth.
- Transfer the custard to a bowl and cover it with a cling wrap. The cling wrap must touch the custard. This is to avoid the formation of skin on the custard.
- Refrigerate until cool.
Assembling the Chocolate Cornets
- Take the custard in a piping bag or plastic bag.
- Make a small hole at the tip.
- Place the bag inside the cornet and squeeze the bag to fill the cornet with the custard.
- Repeat for the other cornets.
- Serve and enjoy.
Notes
Egg Substitutes I used For This Recipe:
For the bread dough I substituted the egg with butter milk and baking powder.
For the custard, I added custard powder instead of eggs.
Both worked out very well.
For the bread dough I substituted the egg with butter milk and baking powder.
For the custard, I added custard powder instead of eggs.
Both worked out very well.


Wow perfect like the bakery ones…yum
Perfectly baked. Nice clicks, looks sooooooo delicious.
Awesome Gayathri, even I’ll be posting mine today, I think we have almost done it the same way..
nicely done. cooking with dog has so so cute videos. I love that dog even don’t try to touch anything.
Perfect! Ideal for a tea-time snack
OMG! these look super tempting…perfectly done and awesome clicks!
OMG this is super tempting,perfectly done.
Wow……..reminded of the bakery we used to get these from…….perfectly done ……love them.
Looks fabulous Gayathri. I have to give a pass this time, as kids weren’t interested in chocolate filled stuff.
wow….gayathri…..so gporgeous luking cornets….yum
Wow, gayathri, a real challenge dear, they look Gorgeous!!!!
looks super delicious gayathri! happy to follow u!…:)
The looks perfect and so are the photos. I am following you now and I wonder why I did not find you before.
Perfectly done 🙂
It was a fun experience baking them.. Thanks for choosing this recipe.
yum yum, wat a super tempting recipes n pics.
nice cornets recipes.i checked each n every cornet recipe posts.iam excited 2 try this…vl try very soon dear.
maha
Hi Gayatri, sorry for being very late.., your rolls look perfectly baked., looks absolutely delicious.., I have posted mine.., do visit when you have time..
i m jain. not much fond of cooking but coz of my son i love to try something new everytime.but felt inferior whenver eggs came in recipe…i have newly developed learning & making skill of designer cakes(decorative cakes).& quite succeded in it & improving myself more& more..nice to visit yor blog.vl help me & boost my confidence to experiment .thanks to share your recipes..
can I store this.. will it not become soggy. should I store this in refrigerator/air tight box. also guide me about the shelf life pls.
You need to refrigerate this for long time storing Shradha. In room temperature it may come to a single day.
Thanx a ton gayatri for the help. I wanted to prepare the cornets in advance for diwali. Can i bake the same 4-5 days in advance and store in an air tight container.
Also, after filling the cornets if I store in air tight container in a fridge. Will it become soggy.
Shradha, cornet will keep in room temperature for only one day. Why not freeze them and thaw them out when required? And you can refrigerate filling in a jar and use it when needed..
very elaborate recipe… but i should give it a try sometime.. and its also well organized & written