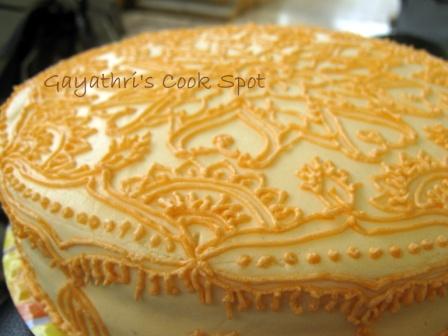
My neighbour had asked for a birthday cake for her son. As he didn’t want to celebrate his b’day, she wanted to decorate the cake with a simple design without any letterings. So I decided to do a mehandi designed cake. I got a piece of the cake and it was very tasty. I think the designing was also nice. As mentioned earlier, I am giving the steps included in the decoration of this cake. Sorry for the lengthy post. Hope you enjoy it. Sending this to Akila’s Dish Name Starts With E
Ingredients:
For the cake: Flour-250gm Butter-100gm Condensed Milk-400gm / 1 tin Baking powder-2tsp Soda-bi-carb-1tsp Milk-1cup Vanilla Extract-1tsp
For the frosting: Simple Syrup: Sugar-1cup Water-1cup
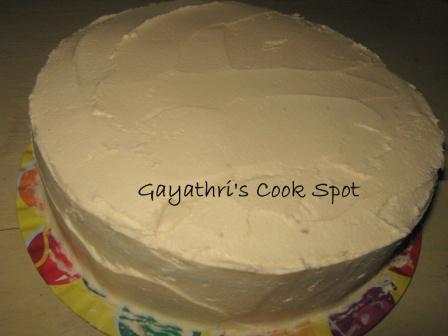
Procedure: Cake: 1. Beat butter and condensed milk. 2. Sift flour, baking powder, soda 3 times. 3. Mix vanilla extract and milk. 4. Add milk and flour alternately to the butter mixture. Mix it slowly. 5. Grease 2 9″ tins and dust with flour. 6. Pour the batter into the tins. 7. Preheat oven to 175C. Bake the cakes for 25 minutes or until a tooth pick comes out clean. 8. Remove from oven and let it cool for 5 minutes. 9. Invert on to the wire rack and allow it to cool completely before frosting. Simple Syrup: 10. Mix sugar and water and bring it to a boil. Switch off stove and allow it to cool. This is the simple syrup. 11. With a serrated knife trim the cake to make the top even. Butter Cream: 12. For the butter cream, beat butter until soft. 13. Add the icing sugar and slowly incorporate it into the butter. 14. When you have finished adding the sugar, add milk and vanilla extract. 15. Beat it for 5-7minutes. The more you beat, the smoother the butter cream will be. Frosting and Decorating: 16. Take about 1/2cup of butter cream and add 2tbs milk to make the butter cream thinner. 17. Apply 2tbs thin butter cream on a plate and keep one trimmed cake on it. The butter cream acts as a glue and prevents cake falling from the plate. 18. Drizzle 4tbs simple syrup on the cake. This will make the cake moist. 19. Apply a layer of the thin butter cream on the cake with a spatula. Keep the other cake upside down on the frosting. 20. Now take the frosting with the back of a spoon and fill the gaps between the cakes. 21. When finished, the cakes should look like one cake. 22. With a spatula smoothen out the frosting. This is called as the crumb coat. Crumb coat should always be thin compared to the top frosting. This layer prevents the crumbs from mixing into the main frosting. 23. Allow it to dry for 30 minutes. When touched, the icing should not stick to your finger. 24. Take 1 cup of butter cream and add 2tbs milk and the required colour. Mix well. 25. With a spatula apply this generously on the cake covering it fully. 26. With a spatula Smoothen out the frosting and remove any excess frosting. 27. At this stage the frosting may be uneven. But don’t worry. 28. Allow it to dry for another 30 minutes. Some prefer to refrigerate the cake at this point. But be patient. Air drying will give you the best results. 29. When the frosting is dry, take a plain tissue paper and keep it on the side. With a spatula smoothen it out. (refer photo tutorial) 30. After the sides are done concentrate on top. When you are satisfied with the smoothness, you can start decorating. 31. I used mehandi design for this cake. You can design it according to your wish.
Photo Tutorial:
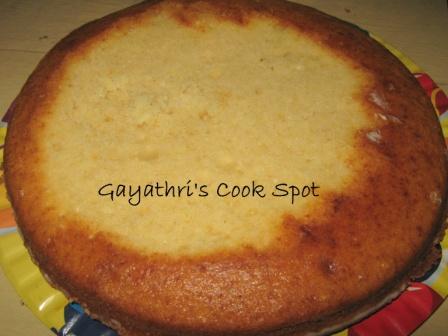
Cake Batter
Cool on Wire rack
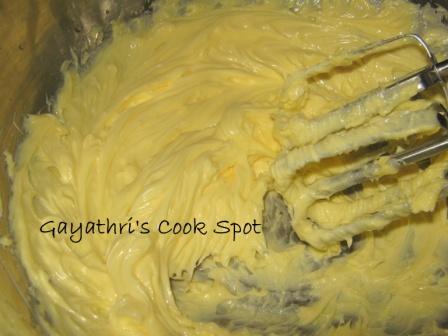
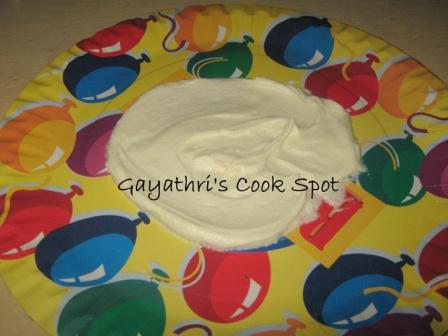
Beat butter until fluffy
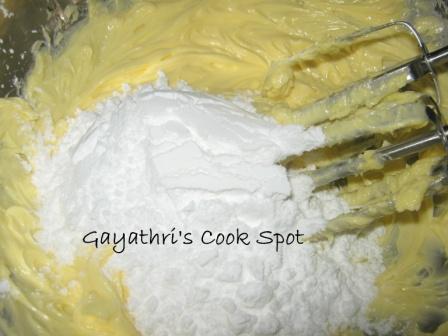
Add icing sugar
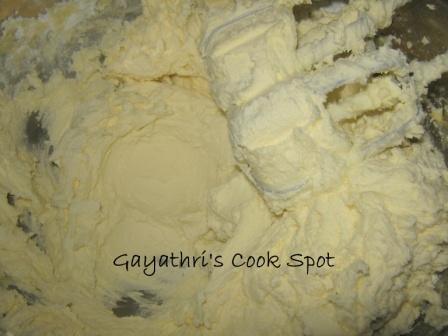
Beat till fluffy
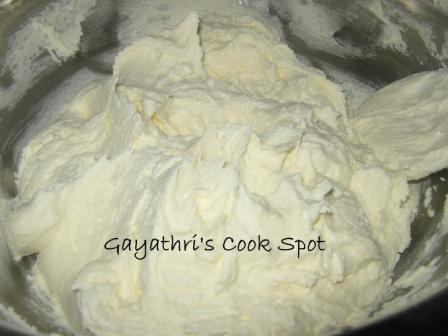
Add milk and beat
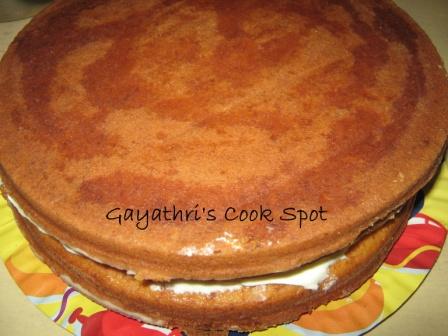
For the crumb coat(frosting is thinner)
Apply on the plate
Keep a cake on it
The simple syrup
Sprinkle syrup, apply a layer of frosting and place the other cake on it
I love painting, dress designing and of course cooking. This blog which started as an online cookery book has given me a great insight into baking and has transformed me into a home baker who is now thriving to learn a lot about cakes and decorating techniques. This blog has thousands of tried and tasted vegetarian recipes around the world and eggless bakes.
Wow,gayu ma,it looks wonderful,pretty and professional!! That too eggless cake,wow,i love this,I should try,I am now all searching for frosting,you have a very detailed post,thanks for this post! Do you use electric beater for beating the butter to make cream,I dont have one ,i have only a hand egg beater,will it give same result? Also how are you smoothening the outer frosting?are you using something like butter paper? Do we need to refrigerate before smoothening? Sorry for toomany questions,you see I am just a beginner in baking,hehe
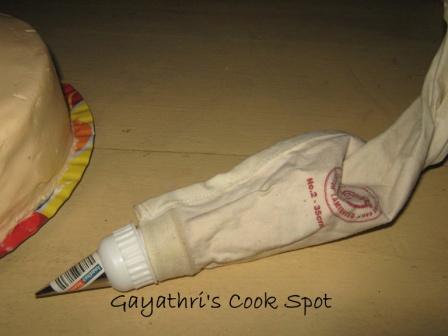
Thats okay Raks. About your questions: I use an electric beater. But if you don’t have one don’t worry. I used wooden spoon for beating before i got the beater. But it takes a lot of beating. I use a plain tissue for smoothening the outer layer. If we use a designed pare the designs will be marked on the frosting. No need to refrigerate the cake. Just leave it for 30 minutes and the frosting will crust.
what a perfect cake, looks like its made in a bakery!! luv the mehendi design too. never mind abt the lengthy post, i admire ur patience to post such a detailed recipe!!
wow, what a lovely cake. I missed out this post before organizing the B’day party for my kids. Wish I had come here early and did the same. Easy and simple way. Looks exotic.
Dhana, I bought them near Rajmahal. There are many essence stores in that street. You can get them there. Please ask for liquid food colours. I tried using powders but the result was not very good.
I used sweetened condensed milk and not evaporated milk. That is why I haven’t added sugar in the recipe. The sweetness of the condensed milk is sufficient.
Hi gayathri, first time I am going through a bunch of recipes all at once from your blog – your Eggless bakes leave me speechless – you are very gifted! I hope you can send another entry for my event – would love to see more from you – xoxo priuya
hi Gayathri!!! First of all, congrats for such a wonderful blog! I am totally amazed by the number of recipes in your blog. To tell you frankly, I am a total beginner in cooking, but i wanna try out my hand at cooking. your blog will guide me a lot. i have a big doubt: i have a micro oven. can pastries be made using micro oven? Could you post such recipes? i would really be happy to surprise my hubby with tasty cakes….
Hi, thank you so much. If you have a combination mode microwave oven then you can do all the cakes and pastries in it. But if it is only microwave then it is not possible. As i don’t have a MW oven, I don’t mention it in my posts. But to use it in convection mode, just set your MW to convection ode and preparemas per the recipe. It works just like the usual OTG in that mode..


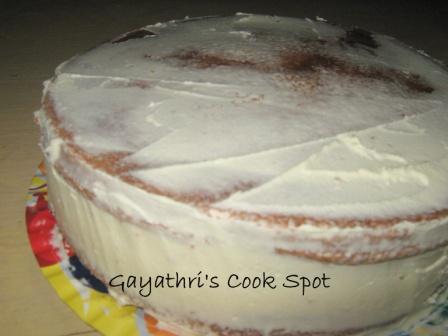


Superb cake n decoration n good step wise pics..I m sure ur neighbor would have been happy 2 see d cake…
Nice photo tutorial Gayathri!Cake and decorations are beautiful!
wow!!!
looks lovely dear….
nice illustrated clicks 🙂
Marvellous cake gaythri…absolutely fab… the tutorials are so detailed… loved it..u rock!!!
LOOKS WONDERFUL DECORATION IS MARVELLOUS
Cake with condensed milk is new to me. I am going to try this cake this week. Thank you for the recipe. It looks so gooooooooood!
Beautiful cake.
Hey,
Nice looking cake dear…:)New design!!:)
Dr.Sameena@
http://www.myeasytocookrecipes.blogspot.com/
Lovely looking cake. Thanks for the illustrated clicks,awesome.
Tiring job, but you make it look simple and beautiful.
Woww wat a gorgeous and beautiful cake, lovely frosting..simply awesome..
fantastic…..
Kurinji kathambam
Wow,gayu ma,it looks wonderful,pretty and professional!! That too eggless cake,wow,i love this,I should try,I am now all searching for frosting,you have a very detailed post,thanks for this post!
Do you use electric beater for beating the butter to make cream,I dont have one ,i have only a hand egg beater,will it give same result?
Also how are you smoothening the outer frosting?are you using something like butter paper? Do we need to refrigerate before smoothening?
Sorry for toomany questions,you see I am just a beginner in baking,hehe
cake looks so perfect and yummy and thanks for ur step by step recipe
Hey gayathri,I thought another friend of mine whos name is also gayathri,thats y addressed you as gayu,please dont mind,sorry about that!
Thats okay Raks. About your questions: I use an electric beater. But if you don’t have one don’t worry. I used wooden spoon for beating before i got the beater. But it takes a lot of beating. I use a plain tissue for smoothening the outer layer. If we use a designed pare the designs will be marked on the frosting.
No need to refrigerate the cake. Just leave it for 30 minutes and the frosting will crust.
Wow! This is the work of a professional. Just fantastic.
Beautiful designer cake..looks gorgeous and professional.
You call this simple, this looks extraordinarily gorgeous.
BEAUTIFUL cake..looks so professional n perfect!!
US Masala
wow..lovely cake..
and the mehendi design is so innovative..
RecipeRaaga
Eggless cake with awesome perfect professional designs. Nice job.
this is just perfect and the design on top of the cake is…too good for words…
Reva
cake looks wonderful with a professional touch
wow..cake looks perfect and yummy…and I loved your decoration…beautiful..
what a perfect cake, looks like its made in a bakery!! luv the mehendi design too. never mind abt the lengthy post, i admire ur patience to post such a detailed recipe!!
Simply superb…Nice design …thanks for sharing…
Very intricate and deatiled frosting.Loved the idea of mehandi design:) Well illustrated and explained.Your neighbor must be thrilled with the cake 🙂
It’s almost too pretty to eat!Nice work with the
decorations!
wow, what a lovely cake. I missed out this post before organizing the B’day party for my kids. Wish I had come here early and did the same. Easy and simple way. Looks exotic.
Thanks for the reply Gayathri,this will help me a lot 🙂
What a wonderful piping work! I’m impressed!
Hi can you please tell me are you using evaporated milk? Or Sweet condensed milk? If it is very think then it sweet condensed milk. Thank you
where did yu get the icing colours in madurai…????
Dhana, I bought them near Rajmahal. There are many essence stores in that street. You can get them there. Please ask for liquid food colours. I tried using powders but the result was not very good.
I used sweetened condensed milk and not evaporated milk. That is why I haven’t added sugar in the recipe. The sweetness of the condensed milk is sufficient.
Hi gayathri, first time I am going through a bunch of recipes all at once from your blog – your Eggless bakes leave me speechless – you are very gifted! I hope you can send another entry for my event – would love to see more from you – xoxo priuya
Love the cake. .the decorations are superb 🙂
awesome cake recipe dear.i am happily following ur blog to get more delicious dishes 🙂 u can visit my blog too
http://taste-and-talk.blogspot.in/
hi Gayathri!!! First of all, congrats for such a wonderful blog! I am totally amazed by the number of recipes in your blog. To tell you frankly, I am a total beginner in cooking, but i wanna try out my hand at cooking. your blog will guide me a lot. i have a big doubt: i have a micro oven. can pastries be made using micro oven? Could you post such recipes? i would really be happy to surprise my hubby with tasty cakes….
Hi, thank you so much. If you have a combination mode microwave oven then you can do all the cakes and pastries in it. But if it is only microwave then it is not possible. As i don’t have a MW oven, I don’t mention it in my posts. But to use it in convection mode, just set your MW to convection ode and preparemas per the recipe. It works just like the usual OTG in that mode..
cake is looking gorgeous and beautiful…. 🙂 .can we replace condensed milk with curd….
Hi madhu,There is a recipe using curd but here you can’t replace condensed milk. As it is the only sweetener, the recipe needs to be changed totally.
gorgeous and beautiful…. 🙂 .can we replace condensed milk with curd….
Hi gayathri.. i tried dis recipe…but am gettin baking soda taste from cakes… what to do ??
May be you change the type of baking soda used.
Thanks for the amazing recipe….. going to try this out very soon!!