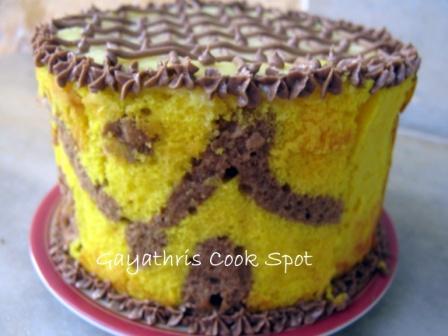
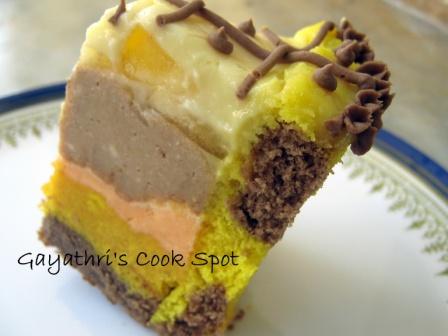
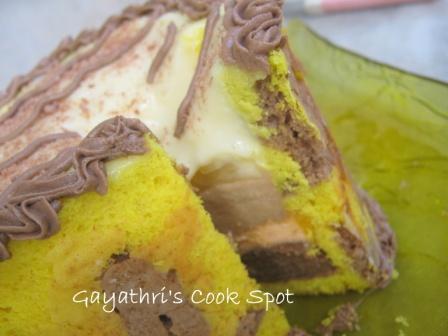
This monthAstherosheofaccro challenged us with the French cake Biscuit Jaconde Imprime/Entremet. This was really a great challenge. A sponge sheet with a pattern baked on it is arranged inside the wall of the mold and is filled with interesting fillings. As I had to do an eggless version, I did a lot of experiments. At last I got a great Entremet. Though it doesn’t look very pretty, it tasted great. I had some guests and I was so happy to serve them with this yummy cake. Every one liked it. I even packed one for my friend’s son. With the given measurements I got two cakes. I am very sorry about the length of the post but I have to do this because I wanted to share my full experiment with you guys…
Ingredients: For the cocoa paste: Condensed milk-100gm Butter-25gm Flour-50gm Cocoa Powder-10gm Drinking Chocolate-10gm Chocolate essence-1/4tsp Baking Powder-1/2tsp Soda-bi-carb-1/4tsp Butter Milk-4tbs
For the Yellow Sheet Cake: Condensed Milk-200gm Flour-125gm Butter-50gm Baking Powder-1tsp Soda-bi-carb-1/2tsp Milk-3/4cup Buttermilk-1/4cup Vanilla Extract-1/2tsp Yellow Food Color
For the Chocolate Butter cream:
Butter-50gm
Icing Sugar-175gm
Drinking Chocolate-20gm
Cocoa Powder-20gm
Chocolate Essence-1/4tsp
Milk-2tbs
For the Custard Layer: Milk-1cup Custard Powder-2tbs China Grass-50gm Sugar-4tbs
Procedure: 1.Mix flour, baking powder, cocoa powder, drinking chocolate and soda given for the paste. 2. Cream butter and condensed milk. Add the flour mixture and butter milk and mix to form a thick paste. 3. On a baking tray, apply butter and keep a butter paper on it. The butter will hold the paper on the tray. 4. Grease and dust the butter paper. 5. Take the paste in a plastic bag. Give a small cut at the tip of the bag. 6. Pipe out desired designs on the prepared butter paper. 7. Now switch on oven and set the temperature at 175C. 8. Beat butter and condensed milk given for the sponge sheet. 9. Sieve flour, baking powder and soda. 10. Add milk, flour and butter milk alternately and prepare a thin cake mix. ( I prepared the mix using only butter milk and the sheet didn’t hold the shape. It came into pieces) 11. Take this cake mix in a plastic bag, cut the end and pipe the mix on the butter paper filling all the gaps. 12. Bake for 5-6minutes. Be Careful. I baked mine for 8 minutes and the cake started browning. 13. If a tooth pick comes out clean, remove the tray from oven and flip the sheet on a wire rack immediately. 14. If the cake is not inverted on the wire rack, then the steam from the hot cake will make it soggy and it will be impossible to line the mold. I experienced this in a test attempt. 15. Let it cool. 16. Bake the remaining paste in a greased and dusted cake tin and allow it to cool. 17. If you have a mold then the work is a lot easier. As I didn’t have a mold, I prepare one with chart paper. 18. Line the inside of the mold with buttered butter paper. 19. Cut the sheet cake to the desired length and width. 20. Line the mold with this sheet. Be careful. You have to handle it like feather. 21. When finished with the lining, crumble the remaining cake to a fine powder. 22. Cut the cake baked with the paste to the size of the mold. It has to fit the base. Cut it accordingly. 23. Place the mold on the plate. Place the base cake inside. 25. You can prepare one cup of butter cream for the filling. 26. Mix the cake crumbs with 3tbs butter cream and prepare a smooth dough. 27. Fill the cake with this cake dough followed by a layer of plain butter cream. 28. Break marie biscuits and run it in the mixer to make a fine powder. 29. Mix cold milk to make it a smooth paste. Add a layer of this mixture. 30. Peel and slice Apple to thin slices. 31. Arrange the slices on the marie biscuit layer. 32. Mix custard powder in 1/4cup of milk. 33. Boil 1/2cup milk and add the custard milk and sugar. 34. Wash china grass and add it to the remaining milk. Boil it on low flame until the china grass dissolves completely. Add this to the custard milk. 35. Bring it to boil and switch off stove. 36. On cooling, it will thicken. 37. Arrange a layer of this custard on the apples and fill the cake fully. 38. Allow it to set in refrigerator. 39. After the custard is set, decorate the top with chocolate butter cream(cream all the ingredients for the butter cream). 40. Serve cool.
I love painting, dress designing and of course cooking. This blog which started as an online cookery book has given me a great insight into baking and has transformed me into a home baker who is now thriving to learn a lot about cakes and decorating techniques. This blog has thousands of tried and tasted vegetarian recipes around the world and eggless bakes.
Hi Gayathri,Looks Great!!!! i havent done mine yet, Made some experiments for the sponge cake yesterday, came out good!!! Planning to today the full joconde today!!!! Wish me Luck girl!!!!


You did a wonderful job, awesome filling.
Woooow, Fabulous & awesome cake, Well described..
Thanks for sharing
Brilliant!!! I can tell this tastes super yummy with so much going on in it.Very well illustrated steps!!!
Great effort,looks wonderful and delicious.
Wow, u have taken lots of interest in baking this, kudos to u, well done. Loved the illustrative clicks.
woow! This looks awesome.. sounds like an interesting and fun preparation
amazing, love the filling and the design. could not do this challenge this month
Speechless..
Beautiful…..love the design.
Hi Gayathri,Looks Great!!!! i havent done mine yet, Made some experiments for the sponge cake yesterday, came out good!!! Planning to today the full joconde today!!!! Wish me Luck girl!!!!
lovely and delicious cake with a detailed demo.
Love the filling and great job on the Challenge gayathri..
wow! really beautiful.. u have great patience to do all the steps.. well done!
Loved the detailed pics of it…looks really yummy
Admire your love for baking and your interest in trying other countries cuisine, many of them, I have never heard of before.
gr8 recipe and nice presentation looking so tempting and yummy
Gorgeous and pretty jaconde, can guess how u love baking, worth to try..
superb dear thanks for ur step by step recipe
u r so talented dear…gr8…….recipe…
Kurinji Kathambam
Event : Healthy Recipe Hunt – 1 (Aval/Poha/Riceflakes)
Kurinji Kudil az
Looks very cute Gayathri that too without egg really great to achieve this.
i have interest to cook myself. superb dishhhhhhhh… thank you … carry on…..
You really do take a lot of trouble to give your readers the best. HATS OFF to you.
Omg! this looks amazing and you have a lot of patience for trying this out.Very well explained.Great Job!
Love the colorful pattern, it does look very pretty. And hope it would have tasted so too.
Stunning you made an eggless version of the challenge. It sounds and looks so delicious well done, I love your step-by-step photographs.
Cheers from Audax in Sydney Australia.
I’m impressed that you made an egg-less biscuit! The image of the inside of your entremets looks fantastic, nice work on this challenge!
Gorgeous dear,you have done a brilliant job..must have tasted great.
hiyo akka……looks so yummy…..feel like tasting this cake now….yummyyyy…..
Wow you are really patient. I would have dumped it. great really.
Great job dear..biscuit looks delicious..
wowww wonderful job..looks fantastic!!
wow ..that looks so perfect n yummy….
சூப்பர் சூப்பர்
Nice illustration and neat presentations..YUMMY..
Quel raffinement!! Il est tout en beauté:) Bon jeudi;)xxx
That looks spectacular..great work!!
US Masala
I was so curious how people made their jocondes eggless! Yours looks fabulous, and the flavors really sound tempting. Thank you so much for sharing!
My favourite yellow colour! looks yummmmmmmm!
Brilliant!!!Great work dear.
Great work…u done it so fabulous!!Delicious!!
Hats off to you…You have done a real good job. Very well explained.