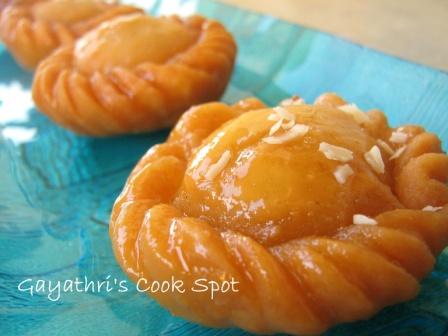
When Jayashri announced Blogger Marathon with Raks Kitchen for this fortnight, I remembered the badushah recipe I saw there. Badushah is my favourite sweet from childhood days. When I started cooking, I wanted to prepare it at home. Some recipes I tried didn’t give the expected result. When I saw the photos in Raji’s blog, I wanted to try it. Now I got a chance to try. It came out so nice. Raji has also included two you tube videos demonstrating the method of spiralling the edges. It was very useful. I have included some pictures demonstrating the method. I followed Raji’s recipe exactly except for the syrup. I have a book in which the badushas are dipped twice in the syrup. I followed that method which I will explain in the procedure part. I am sending this as an entry to Jayashri’s event Blogger’s Marathon
Today is the final day of the week long Blogging Marathon. I learnt a lot in these 7 days. Hope Valli calls for another Marathon. I will be very glad to participate. Check out the 26 blogger friends running along with me!
Ingredients: For the badusha: Flour-1 1/2cups Butter-1/4cup Oil-1/8cup Sugar-1/2tsp Curd-1 1/2tsp Baking Soda-2 pinches Water-1/4cup Oil-For deep frying
For the syrup: Sugar-3/4cup Water-3/4cup Cardamom powder-2pinches Lime Juice-1 tsp
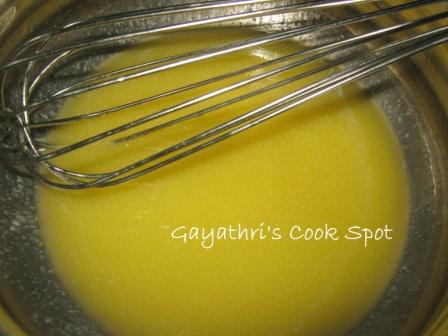
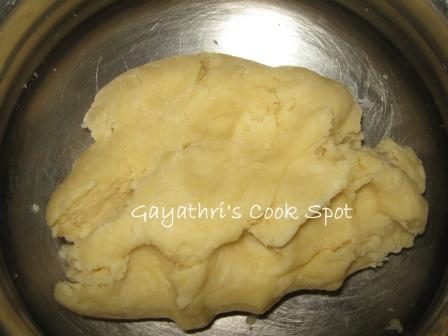
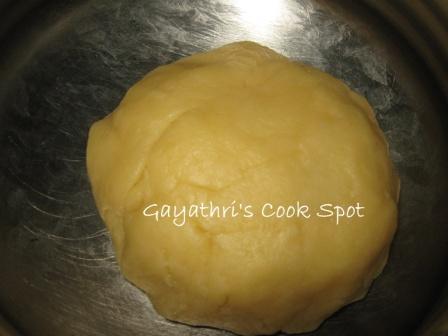
Procedure: 1. Melt butter and add oil,sugar, soda and curd. 2. Whisk to make it frothy. 3. Add the flour and mix it with a for. The resultant flour will be crumbly. 4. Add water to make it a soft dough. If needed add a little more water. Knead it for 10minutes to make it smooth. 5. Divide the dough into 9 equal balls. 6. Shape the badusha as shown in the tutorial. 7. Heat oil. When a small bit of dough is dropped, it should immediately come up. this is the perfect temperature. 8. Drop 4 or 5 badushas in oil. 9. Remove from flame. When the badushas start floating, keep the pan on medium flame and fry them till golden brown. 10. Meanwhile mix water and sugar and let it boil. When the syrup becomes sticky, add cardamom powder and lemon juice.Switch off flame. ( adding lemon juice avoids crystalization of sugar) 11. Add the hot badushas into the syrup. Let it be there for a minute. 12. Remove from syrup and arrange on a plate. 13. When finished with all badushas reheat the syrup. This time you need the syrup to have one string consistency. 14. There are so many methods of checking the consistency. a. When dropped in water, it should not dissolve and lie as a thin thread. b. When taken between thumb and fore finger, it should form a fine thread. c. When you take it in a spoon and allow it to fall inside the vessel, it should hang as a thin thread. I wanted to take some snaps, but as I was alone while preparing, I couldn’t get an exact picture. 15. Now dip the badushas 2 at a time into this syrup. 16. Place them on a greased plate. They will be sticky when hot. But on cooling the syrup becomes firm and it will not stick. 17. Store in an air tight container.
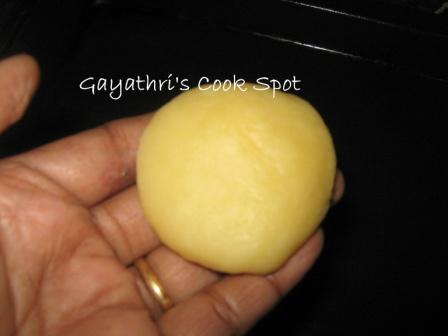
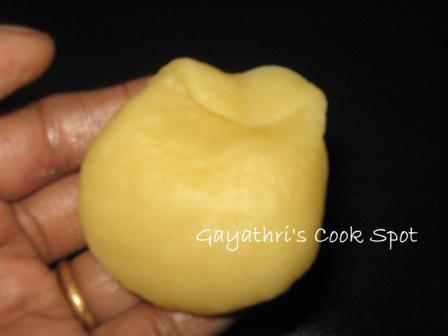
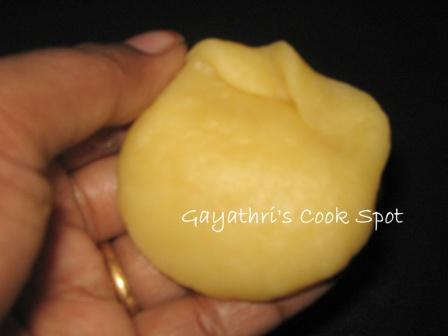
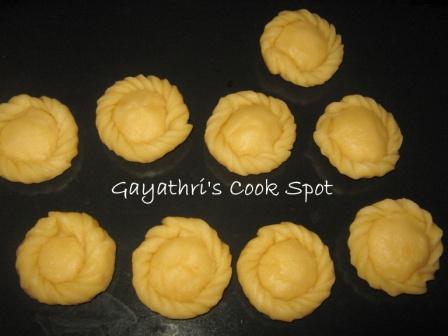
Photo Tutorial:
Whisk melted butter with oil, sugar, soda and curd
Add flour
Make it crumbly
Add water and prepare the dough
After kneading for 10minutes
Flatten a ball
At one end pinch the dough to make it more flat
Fold it over
Pinch the edge of the fold
Fold it over the first
Repeat it
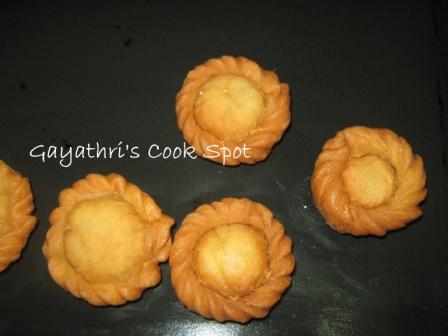
Finished spiralling ( you will get it right after experience)
Finished spiralling
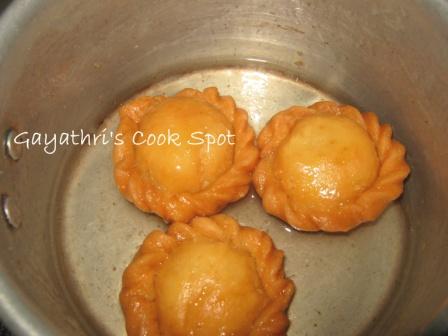
Drop in hot oil and remove from flame
Badushas will start floating
Fry on medium flame till golden brown
Dip in the first syrup
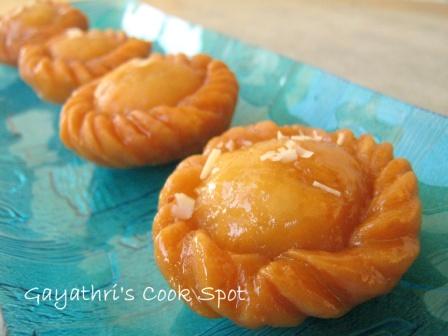
Arrange on a plate
After the second coating. I decorated it with sliced almonds
I love painting, dress designing and of course cooking. This blog which started as an online cookery book has given me a great insight into baking and has transformed me into a home baker who is now thriving to learn a lot about cakes and decorating techniques. This blog has thousands of tried and tasted vegetarian recipes around the world and eggless bakes.
Yummy…Perfectly made and so tempting. Love your step by step pictures. Please never give that up as it gives people like me confidence on making the dish.
Awesome …couldn’t believe that u made it for the first time …very much perfect …Thanks for the detailed post and stepwise picture …too tempting ..would love to try it soon ..
It looks perfect gayathri…my mom used to make this often before…really missing it these days..with your patience n efforts, it has come out really well.
all the steps r perfect. i would like to know wether we should make two types ofsugar syrup,as u r not clear about it , for the first dip& for the second dip ……one thin for the first dip,after the sweet gets absorbed then dip it in the thick syrup??? finally remove & decorate with almonds sliced????? right??
Hi, The badushas are dipped in syrup twice. First we dip them in thin syrup. After arranging them on plate, reheat the remaining syrup (you don’t have to prepare syrup again. Only the remaining syrup is used). When it boils, bring it to one string consistency. Then remove it from flame and dip the badushas again. The second dipping will form a white crispy layer on top.


Yummy…Perfectly made and so tempting. Love your step by step pictures. Please never give that up as it gives people like me confidence on making the dish.
Super badhusha.. Looks wonderful. Great step wise presentation. Love it.. I am taking the whole plate 🙂
Your Badhusha looks so perfect.I am first time here,loved your space.
Wow..looks awesome and delicious..
perfect & super soft badhushas
My all time favourite sweet! looks yum!
Gayathri, Such a BEAUTIFUL presentation – very artistic. Fantastic finish to the marathon -Wish I could taste some 🙂
badusha looks so perfect n tempting pics… me too wanna try some now.. 🙂
looks perfect gayathri ! loved it
Wow!!! Perfect Badhusha…Luks so tempting…
Beautiful Badushas. My oldest sister is an expert in making these.
Perfect and delicious Badhusha. love it.
Suuuuuuper gayathri..>Awesome and tremendous effort
gayathri, perfect step step by step pictures,fantastic.
super designe is very attractive and recipe step by step is presenting nicely
Yummy and they look perfect.. Would gobble them down in seconds…
Yummy badushaa… My mom used to make it.. aah its so tempting.. nice clicks.. and loved those side folds.. nicely done
ammaandbaby.blogspot.com/
Looks so perfect just like Raji’s …Hope you guys had a wonderful V day
Yummy and delicious badusha…
kurinjikathambam
Event: Healthy Recipe Hunt
Nice…
very nicely explained and perfect badusha to cherish.
FOODELICIOUS
So perfectly made gayathri.. looks so juicy and delicious.
Oh the badusha looks amazing. Loved the recipe 🙂
They came out just perfect like the ones of raks..looks super yumm
love the way you have shaped them..looks nice..
Wwow those badusha’s are truly tempting,they turned out super prefect Gayathri..
Wow it looks so yummy..bookmarking it right now..
Looks fabulous & perfect Gayathri!!!
Prathima Rao
Prats Corner
Basusha looks so perfect..
I am sure that wud b a real treat to my sweet tooth..
Bookmarked!!
Awesome badusha.Looks so professional, Gayathri..
Awesome …couldn’t believe that u made it for the first time …very much perfect …Thanks for the detailed post and stepwise picture …too tempting ..would love to try it soon ..
I had never heard of baducha before, but I can sense it must be delicious! I have to start experimenting on this awesome cuisine!
It looks perfect gayathri…my mom used to make this often before…really missing it these days..with your patience n efforts, it has come out really well.
they have come out beautiful and just perfect..i wish i could pop one in my mouth!
Smitha
http://smithasspicyflavors.blogspot.com/
I love the step by step pictures of crimps on your badusha.
and the sweet of course
Its my favorite. I’m dreooling over it.
My favorite ones. Drooling over them.
wow..looks so cute and delicious…very nice recipe..
Looks perfect Gayathri..
yummmm, this is my daughter’s favourite. Lovely tutorial too:-)_
Badushas have come out very well. Nice photo tutorial.
Yahoo,
This is my favourite sweeet and I love your pictures.
Sumathi.(7 years old)
OMG you made them just like Raks Great one Gayathri
Perfect badusha Gayathri!
looks so perfect color and shape n tempting clicks…love u r step by step processsss…..love to follow you
wow! looks superb !
all the steps r perfect. i would like to know wether we should make two types ofsugar syrup,as u r not clear about it , for the first dip& for the second dip ……one thin for the first dip,after the sweet gets absorbed then dip it in the thick syrup??? finally remove & decorate with almonds sliced????? right??
Hi, The badushas are dipped in syrup twice. First we dip them in thin syrup. After arranging them on plate, reheat the remaining syrup (you don’t have to prepare syrup again. Only the remaining syrup is used). When it boils, bring it to one string consistency. Then remove it from flame and dip the badushas again. The second dipping will form a white crispy layer on top.
Love the badusha.. Too delicious and lip smacking!! Tempting clicks:-)
http://www.unnatisilks.com/