Diwali is over but I am not yet back to my routine. After a lot of travel and being sick, today I wanted to be back to normal. For me being normal means I need to write a post in my blog. This series of posts has been in my mind for long but I kept on postponing for the fear that I may not do justice. But still I gathered enough courage today to start the series. I would never say that I know about baking as it is a vast ocean and what I know may be are some tiny drops of that ocean. I just wanted to share with you all what I know about basics of baking. Every day I get mails and messages asking me about baking. So I thought of putting it all together for everyone else to read. Hope I do justice. Please feel free to ask for any doubts and I will be glad to clarify it for you. To start the series, I will start with the most important gadget of baking – Oven. It is not that you cannot bake with out oven. There are so many ways to bake a cake with out oven but oven makes your job easier. I will be talking of OTG in this post. So here is the first in the series – Baking Basics – Oven

OTG – short form for Oven Toaster and Griller is the most essential gadget you need if you want to take baking seriously. An OTG has two filaments one on top and one on the bottom. It also has three racks to place your baking trays. There are three dials , one for temperature settings, one for function settings and the third a timer. Please bear with my oven photos as my oven is so old that it is not very neat and tidy.

This is the temperature control knob. The minimum temperature you can set is 100°C. The maximum tempearature would be 250°C. Usually 100°C is used for macroons. If you want to dry something in oven when there is no sunlight you can set the oven to 100°C and place it inside with the oven door partially open to have the same effect. 150°C – 180°C are used for cake baking and 200°C is used for bread baking. When baking pizza, you can set the temperature to its maximum – 250°C. These are the basic settings. But every oven is different and you need to know your oven befroe trying out recipes. Some ovens are hotter and you need to decrease the temperature. And if using black coloured trays or tins, you might need to decrease the temperature by 5-10°C. When using a fan forced oven / conventional oven, you need to decrease 20° to get good results. If the recipe suggests 200°C, then you need to set the oven to 180°C.

Next comes the function knob. In my oven there are 5 functions.
Warm: The temperature is maintained to a minimum so that you can place your food in oven to to keep it warm without cooking it further.
Grill/ broil : The top filament is on and to use this feature, place the food on the top most rack. Only the top most part of the food browns. This is usually used to get good browning on top of cakes and breads. After baking it with the usual settings, the dish is usually placed on the top rack and grilled until you get the desired colour.
Rotisserie: I have not used this function from the day I got this oven as I am not into roasting chickens. There is a rod in which whole chicken is fixed and roasted. The rod rotates and the chicken roasts evenly.
Toast: The lower filament is on for this function. The food is placed on the lower rack for this function. You can easily toast bread slices with this function.
Bake: This is the function in which both the filaments are on and the food is kept at the middle rack for even baking. All cakes, cookies, muffins and breads are baked this way.

Next comes the timer. This makes your job easier. If you are going to bake cakes for 45 minutes, then set the timer to 60 minutes. The extra 15 minutes is for preheating. Or if your dish needs more than 60 minutes of baking, then set the timer to always on and keep note of time.

This is the top most filament in the oven.
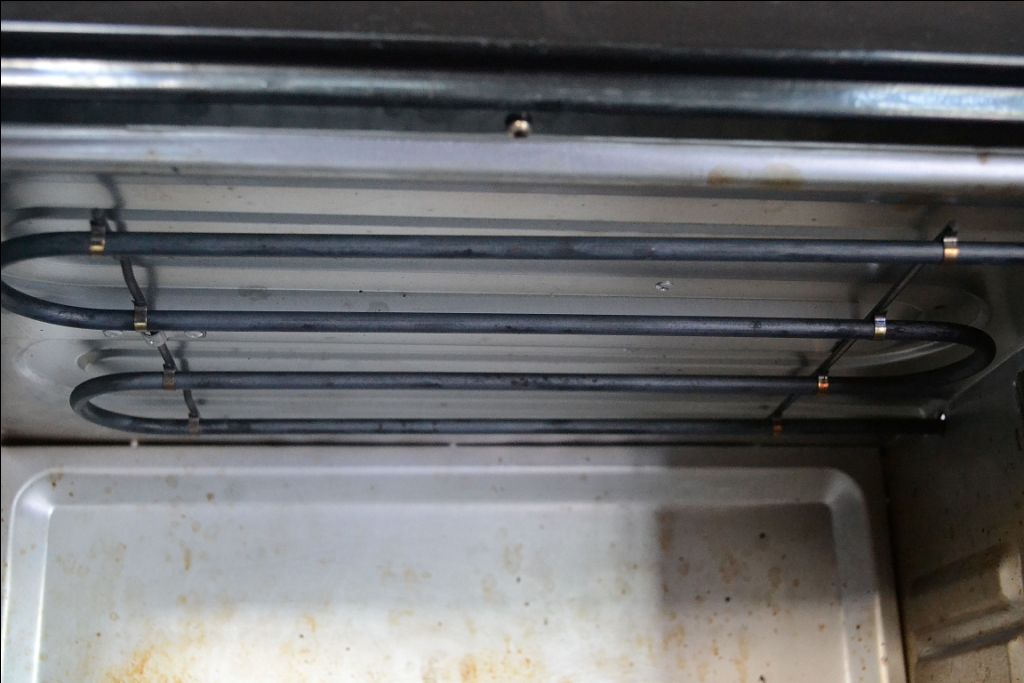
And this is the bottom filament.
To save the filament from spills, there is a drip tray. Always keep this tray to prevent the filament from drips. After explaing to you all the parts and functions of the oven, I would like to give some more pointers to make baking easier.
Always preheat oven for 15 minutes before you put the dish inside.
When baking a cake do not open the oven door for the first 20 minutes as it will disrupt the baking process.
Know your oven. You just can’t blindly follow a recipe without knowing the oven.
Adjust the temperature according to the oven type before baking.
Decide which function you need for the dish. Before placing the dish inside do not forget to adjust the function settings and temperature. I have done this mistake so many times. Using baking while you need toasting will greatly affect the final result of the dish.
Do not forget to check Baking Basics – Tools
Hope this post was helpful. Do share your thoughts…
My other posts in the Baking Basics Series:


I have cooking range with timer but no temperature controller. Tell me how to bake and grill
Uma, does your cooking range work on gas. Then there will be a gas control knob. Many recipes give you the gas marks along with the degrees. You can also look for conversion tables to convert degrees to gas marks..
Hi thnks for all ur wonderful recipes… I hv a 52 ltr otg n wanted to know when v bk 2 dishes of brownies together when n at what temp do v bake n when do v interchange d dishes … Tjnks a lot
Kriti, while baking two trays of brownies, place them in the centre and lower rack. Interchange them after 20 minutes. The temperature would be the same..
This is a wonderful post I was looking for when I started baking…I am following your baking recipes in HBG…awaiting for many more wonderful posts
Really useful post….dear
Hi gayathri. Basics of baking will definitely help a beginner me. I use a microwave oven with convection function to bake cakes. Can u please tell me why my cakes fluff up well wen hot but as it cools it drops down to the height of batter.. this makes my cake dense n not fluffy. Please help..
If the cake batter has more liquid than flour, the cakes will rise in oven and sink while you take it out of oven. Check the recipe you are following..
Hi I’m frm Msia & always like to read your postings on baking and cooking. Just one suggest why not post a video cooking.
Regards.
Hi Shanthyni, I have an idea and am working on it..
Very useful post. I have been using a OTG for a few months now. The manual that came with the oven does not explain as well as you have. Thanks
would appreciate basic tips of using micro oven with convention along with knobs. very useful tips on oTG.
hi gayatri.ur simply superb .i just loved the way u have explained each and every thing.thnk u so much .i am a new beginner .still want to be more familiar to my oven .i hv a doubt regarding my otg tht when should i have to turn on both the rods and for wat knd of baking?
.
Hi Rajni, thank you. whatever dish you are baking, you need to turn on both the filaments unless specified.
Hi Gayatri,
Very useful information. I have been thinking …thinking…. and thinking … for a longtime to get a good oven.. .. which brand is good.. tell me yr suggestion.. I would be using it mostly for baking..
Thanks .. Rajee
Hi Rajee, my vote would go for morphy richards OTG..
Hi Gayathri,
I tried your Pav receipe and the final result was awsome.
A Question :
Do we have to put drip tray below the filament or above?
Because if we put it above than the bottomside of the dish will cook properly or not? I mean the drip tray won’t be the cause of heat resistant?
Do we have to put drip tray in making all the dishes like cake,Pav etc. or while using barbecue rods?
Please Reply….
Thanks in Advance.
Drip tray doesn’t control the heat Jalprit. I usually keep it on the bottom most shelf especially the rack provided for the drip tray and haven’t found any problems with that. But if you want to know whether it is necessary, then it is not absolutely necessary. Only place it when using it for barbecue.
Thank You so much Gayathri……You did a great help 🙂
Hi mam,very useful info…thank you mam…I have a doubt pls clarify it mam..(if i plan to make a layer came )in my otg oven only 1 pan can fit at a time , how can I store remaining batter for multiple batch mam..is it possible to store the remaining batter until 30 -45 mints? Pls help me mam…thank you ..
Yes one batch of batter can stay out for 40 minutes. Once the first cake is done, give a nice stir to the batter and pour it in a second pan and put it in oven immediately..
Hi Gayatri,I am planning to buy an oven but am not able to decide between an otg or amicrowave convection,can u guide me as to which is best for baking purpose?
Sunita, if you will be baking often, I would suggest OTG.
Thank you ☺
Hi, I have read u have 2 OTG, a sunflame and morphy. Which one will u suggest for cakes n breads? I am using IFB microwave oven with convection option for baking breads n cakes. I bake only for my family. I am planning to buy an OTG, plz suggest.
Morphy Richards is good. I have used it for more than 7 years..
Hai Gayathri can i buy morphy richards 28rss for my basic baking or should i buy a bigger one.pls suggest
It depends of how frequently you will be baking. And also depends upon the size of your family. If everything is fine, then 28lt would do for a beginner in baking..
Thank you gayathri for ur reply!
Hi Gayathri, I am following your recipes and videos. Learnt a lot from you, thank you so much for sharing your recipes. You inspired me into baking, of course am just a beginner and I bake only for my family. Whenever I bake cookies, biscuits and bread I encounter a big problem the lower part gets burnt and upper layer remains soft. I tried reducing the temp also, can you please help me overcome this problem. Thanks in advance and God bless you and your family
Hi Sanjana, I am so glad that I could be of inspiration for your baking. Do you keep both filaments on? This type of problem arises when you have just the bottom one on. But if you have both of them on, then it is time to speak to the service person, because something may be wrong with the oven. Hope the issue resolves soon. Happy Baking!
Hi Gyathri,
Thanks a lot for the information you shared on the baking basics. I am new to baking and like to try baking cakes and brownies. Have baked twice till now. However both the times my cake didn’t rise and also it had a crusty top. it was cooked properly however. I am using Hindware OTG. Any idea on why it is happening? I also preheated the oven at 175 as mentioned in the recipe.
Thanks a lot.
Deepti
Did you turn both the filaments on. And try preheating the oven for 30 minutes. Some oven take more time to preheat and arrive at the set temperature.
kindly post asinilar detailed version of how to use convection microwave oven .. temp and time to bake cakes cookies pasteries rolls etc… difference between OTG and microwave time and temp. definetly it will be useful for many…
Mam, what is the size of your oven?
Mine is 66 litres
This is a wonderful post. I was looking for when I started baking… I am following your recipes and videos. Learnt a lot from you, thank you so much for sharing your recipes. You inspired me into baking, of course am just a beginner and I bake only for my family. Here I tried to write similar content as yours..
Hello, Gayathri I’m watching your videos and cooking. I learned a great deal from you, and I appreciate you sharing your recipes. You gave me the idea to start baking, but I’m still a beginner and mainly make food for my family. One major issue I have with baking bread, biscuits, and cookies is that the top layer always stays soft while the bottom layer burns. I also tried lowering the temperature; could you maybe assist me in solving this issue? Thank you and may God continue to bless you and your family.
Hi, good to know about your baking journey. Do you switch on both filaments or just the bottom filament? the problem sounds like baking with just the bottom filament or bake mode. If it is so, then switch on both filaments or change to toast mode and try. This will uniformly bake the dish.