I was planning to do checker board cookies for a long time. When I saw the cookies at Baking Obsession, I couldn’t take my eyes away. I bookmarked it immediately and tried it out today. The preparation of the dough took me two days in advance. So I started preparing the dough day before yesterday and ended up with baking the cookies today. Though the result didn’t even come near the original cookies, I was satisfied with the result. I think practice make it perfect. My daughter loved those with chocolate border because it has the maximum amount of chocolate dough in it. Perfect for chocolate lovers. These cookies are crisp on the edges but chewy in the middle and were perfect with coffee. I have also tried it as an eggless version. Today is the fifth day of Blogging Marathon and I am linking this to Kid’s Delight– Eggless and Vegan Bakes guest hosted by Priya and started by Srivalli. I halved the original recipe and got 2 1/2dozen cookies. You can prepare a large batch and freeze the dough block and bake the required amount of cookies when needed.

Ingredients:
For The Chocolate Dough:
Flour-1 1/4cup
Unsweetened Cocoa Powder-1/4cup
Baking Powder-1/4tsp
Salt-a pinch
Butter-1/2cup
Granulated Sugar-1/2cup (grind it to fine powder)
Vanilla-1tsp
Curd-1/4cup
Baking soda-a pinch
For The Vanilla Dough:
Flour-1 1/2cup
Baking Powder-1/4tsp
Salt-a pinch
Butter-1/2cup
Granulated Sugar-1/2cup (grind it to fine powder)
Vanilla-1tsp
Curd-1/4cup
Baking soda-a pinch
Procedure:
Vanilla Dough:
1. In a bowl, mix flour, baking powder and salt.
2. Beat butter and sugar until light and fluffy.
3. Add curd and baking soda and add it to the butter mixture.
4. Add the flour mixture and mix with a spoon until incorporated.
5. Place it in a wrap, shape it into a square and cover.
6. Refrigerate for 2 hours or overnight.
Chocolate Dough:
1. Sift together flour, cocoa powder. Mix baking powder and salt.
2. Beat butter and sugar until fluffy.
3. Mix curd and baking powder, add it to butter and beat well.
4. Mix the flour into the butter mixture with a spoon.
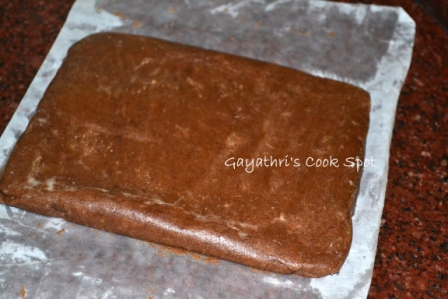
5. Place dough in wrap, shape into a rectangle, cover and refrigerate.
Assembling the checker board pattern:
1. Remove both the dough from fridge, divide each dough into two.
2. Place one portion of each dough in wrap and refrigerate.
3. Roll out the other portion into a rectangle of 6″*4.5″ with a thickness of 1/2″.
4. Place the rectangle in a butter paper, fold it tight and refrigerate for 2 hours.
5. Repeat for the other flavour.
6. After 2 hours, remove vanilla rectangle from fridge and cut it into 9 equal strips, with each strip measuring 1/2″*6″.
7. Refrigerate again. The strips must be firm when forming the pattern.
8. Repeat with the chocolate rectangle.
9. On a butter paper form the checker board pattern as shown in the pictures.
10. You get two blocks of dough, each measuring, 1 1/2″*1 1/2″*6″.
11. One block will use 4 vanilla and 5 chocolate strips and the other block uses 5 vanilla and 4 chocolate strips.
12. Roll in the butter paper tightly and refrigerate until firm.
13. There are two more portions of dough in the refrigerator. Now remove those portions and roll them into individual squares measuring 6″*6″.
14. Place the block with 5 chocolate strips in the middle of vanilla square and place the other block in the middle of chocolate square.
15. With the help of butter paper bring the sides together so that the sides meet at the upper centre of the block.
16. Press the seam so that it becomes smooth and seam less.
17. Cover with butter paper and refrigerate overnight.
18. Now you have two blocks, one covered with chocolate dough and the other covered with vanilla dough.
19. Next day, slice the block into 1/2″ thick cookies with a sharp knife.
20. Preheat oven to 175C.
21. Arrange the cookies on a lined tray 1 inch apart. Bake for 7-9minutes.
22. Take care that the vanilla dough retains its colour.
23. Cool on wire rack and store in an airtight jar.
24. Serve and enjoy.

Vanilla dough.

Shape and wrap the dough in a plastic wrap and refrigerate.

Divide dough into two, refrigerate one portion.
Roll out the other portion into a rectangle and refrigerate.

Cut into 9 equal stripes and refrigerate.

Separate the strips.

Arrange a vanilla strip in between two chocolate strips. This is the base layer.

Place two vanilla stripes and a chocolate stripe in between on the base layer.
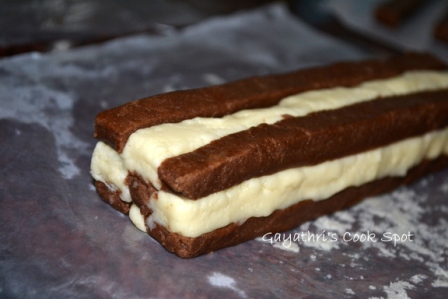
Repeat another base layer on top. Cover and refrigerate. Prepare another block with two vanilla stripe and one chocolate stripe in the centre as the base layer (just the opposite of the first block)

Roll out the remaining chocolate portion into a square.

Place the block with more vanilla stripes in the middle.

Wrap the dough along the side and bring it to the top.

Bring the other side to the top.

Press to make it seam less.

Prepare the other block with vanilla dough.

Cover and refrigerate overnight.

Slice into 1/2″thick cookies.

Arrange on a lined baking tray.

Bake and cool. Serve along with coffee.

A closer look on the cookies.

Eggless Checker Board Cookies
Ingredients
For The Chocolate Dough
- Flour-1 1/4cup
- Unsweetened Cocoa Powder-1/4cup
- Baking Powder-1/4tsp
- Salt-a pinch
- Butter-1/2cup
- Granulated Sugar-1/2cup grind it to fine powder
- Vanilla-1tsp
- Curd-1/4cup
- Baking soda-a pinch
For The Vanilla Dough
- Flour-1 1/2cup
- Baking Powder-1/4tsp
- Salt-a pinch
- Butter-1/2cup
- Granulated Sugar-1/2cup grind it to fine powder
- Vanilla-1tsp
- Curd-1/4cup
- Baking soda-a pinch
Instructions
Vanilla Dough
- 1. In a bowl, mix flour, baking powder and salt.
- 2. Beat butter and sugar until light and fluffy.
- 3. Add curd and baking soda and add it to the butter mixture.
- 4. Add the flour mixture and mix with a spoon until incorporated.
- 5. Place it in a wrap, shape it into a square and cover.
- 6. Refrigerate for 2 hours or overnight.
Chocolate Dough
- 1. Sift together flour, cocoa powder. Mix baking powder and salt.
- 2. Beat butter and sugar until fluffy.
- 3. Mix curd and baking powder, add it to butter and beat well.
- 4. Mix the flour into the butter mixture with a spoon.
- 5. Place dough in wrap, shape into a rectangle, cover and refrigerate.
Assembling the checker board pattern
- 1. Remove both the dough from fridge, divide each dough into two.
- 2. Place one portion of each dough in wrap and refrigerate.
- 3. Roll out the other portion into a rectangle of 6"*4.5" with a thickness of 1/2".
- 4. Place the rectangle in a butter paper, fold it tight and refrigerate for 2 hours.
- 5. Repeat for the other flavour.
- 6. After 2 hours, remove vanilla rectangle from fridge and cut it into 9 equal strips, with each strip measuring 1/2"*6".
- 7. Refrigerate again. The strips must be firm when forming the pattern.
- 8. Repeat with the chocolate rectangle.
- 9. On a butter paper form the checker board pattern as shown in the pictures.
- 10. You get two blocks of dough, each measuring, 1 1/2"*1 1/2"*6".
- 11. One block will use 4 vanilla and 5 chocolate strips and the other block uses 5 vanilla and 4 chocolate strips.
- 12. Roll in the butter paper tightly and refrigerate until firm.
- 13. There are two more portions of dough in the refrigerator. Now remove those portions and roll them into individual squares measuring 6"*6".
- 14. Place the block with 5 chocolate strips in the middle of vanilla square and place the other block in the middle of chocolate square.
- 15. With the help of butter paper bring the sides together so that the sides meet at the upper centre of the block.
- 16. Press the seam so that it becomes smooth and seam less.
- 17. Cover with butter paper and refrigerate overnight.
- 18. Now you have two blocks, one covered with chocolate dough and the other covered with vanilla dough.
- 19. Next day, slice the block into 1/2" thick cookies with a sharp knife.
- 20. Preheat oven to 175C.
- 21. Arrange the cookies on a lined tray 1 inch apart. Bake for 7-9minutes.
- 22. Take care that the vanilla dough retains its colour.
- 23. Cool on wire rack and store in an airtight jar.
- 24. Serve and enjoy.


Wow looks so perfect…very tempting clicks
Wow.. while I was reading I thought.. God so much work.. but the end result.. it is so amazing! Ooooh, they look perfect and yumm! 🙂
cute and delicious cookies with an awesome presentation
Amazing patterned cookies..Appreciate the hard work but I guess the cute looking cookies are just worth the effort!!
u r really a proffesional in baking…..superbly done dear….it luks so cute n perfect…
oh my god..u have some kind of patience to make these and also capture step by step…absolutely lovely Gayathri
These cookies look so awesome… Love that u tried the eggless version.
This looks totally delicious..
Aarthi
http://www.yummytummyaarthi.com/
that s a lot of work and that too great work gayatri!! Loved the look of the cookies at this rate you can sell some 🙂
yummy n tempting cookies.
Amazing job…looks so professional!! great clciks too!!
Spicy Treats
OnGoing Event:Show Me Your HITS~Healthy Delights
You have done such an awesome job gayatri :).. its zoo time consuming but the end result is all worth it ..Hats off to u!
Mouth watering
Whoa awesome pretty cookies !! Great job dear very professionally done !! loved them and will surly try them !!
Ongoing event CC-Dish For Loved Ones
they look gorgeous….perfectly done n presentation is mind blowing…that coffe mug goes so well with the theme of the cookies….Great job!
Even I wud have loved the cookies with the chocolate border 😉
wow… cookies look awesome… looks like a lot of work but the end product is worthy of the effort…. bookmarking this… thanks for sharing…
Perfect and gorgeous cookies. Lovely clicks.
Vardhini
Event: Sweet Luv
Event: Strawberries
wow, quite a lengthy process but end result is worth all these, your tutorial is so good, anyone can try to make this, I’ll definitely try sometime, bookmarked…so perfectly done, Gayathri..gr8 gr8 job
What a treat, thanks for sharing it and for the pictorial steps, simply superb..
Awesome cookies.
amazing gayatri!!great job…superb cookies…looks perfect!
Peak of Patience Gayathri!!!! Cookies look amazing!!!!
Lovely. Looks so neat!
Great Work! very interesting.
Wow so much work. I really admire your persistence Gayatri. amazing
wow awesome dear….u did a gr8 job….lot of work but…worth doing it! thnks for sharing!
Looks fabulous. Thanks for the detailed pics. Will give them a try sooner.
OMG, those are awesome..kudos on your patience and dedication!..love how much efforts you take Gayatri..fantastic..now I am wishing you lived closer..heheheh..
I am hooked to your blog Gayathri, love all your recipes…
Plz pick your award from my space
UK Rasoi
Cheers
Looks great! That is a lot of work for sure..
Patience, patience, patience…that’s what is required for making these spectacular cookies, and you have tons of it, dear. 🙂
They look mind-boggling! 🙂
Thanks for linking.
super duper like!!! wow!! as mentioned above, respect your patience….
wow!! super duper like!!! great one Gayathri…
Perfect cookies.
great job gayathri
Hey! These tasted delicious when I baked them!!!
I was wondering if we could substitute Butter with Oil or Ghee?
Thank you. Ghee would be better than oil.